


12:39: You’ve got one new email.
13:05: You’ve got one new email.
By 18:00, you’ve got fifty of them. Everything, including newsletters, has somehow landed up in the primary tab. The labels? Those only sorted newsletters by sender, not by urgency to reply.
A few days back, we almost missed a subscription renewal buried on page three of that list. That’s when we decided to build a triager tool for ourselves. Something that actually remembers what "urgent" meant to us. Today, we’re sharing that exact workflow with you. Set a timer for 90 minutes. We’re beginning right now.
1 month of Granola free. Start today.

We’ve tried several AI note-takers at GrowthX, and Granola has been our go-to for the past year. It gives us comprehensive prep notes before every meeting, near-accurate transcripts, and even makes follow-up tasks like emails and planning easy. Try Granola Pro free for 1 month by signing up using the link below.
But first, what makes a good triage tool?
A good triage tool does three things. It reads your inbox continuously, makes a real judgment call on each email, and it remembers that judgment the next time, instead of scoring every email cold.
That needs 4 components:
a. something that watches for new mail
b. something that classifies and scores it
c. somewhere the decision gets stored
d. and a way to actually reach you when it matters.
The simplest version pairs two free tools. Apps Script is Google’s own automation layer, and Groq. Here, Apps Script acts as the execution layer, fetching emails, sending them to Groq for analysis, and then sending the Slack message via the webhook. Groq is where the actual thinking happens.
That works fine for regular emails. You set up rules for Groq to work with and the analysis happens accordingly.
But what happens when escalations come up on email? One hey-let’s meet up email. Followed by a “hey, just checking in” email from the same sender. You’d have to tighten the rules, a lot.
Hermes helps with exactly this pattern detection. It reads the email history itself and lets the model infer the pattern — the same four buckets, the same three tiers, just a lighter rubric underneath. The tradeoff? A hardcoded rule is predictable; you know exactly why it fired. An agent that infers from history is more flexible, but you can’t always explain why it decided something was urgent.
But going that route means a slightly more advanced setup: IMAP instead of the one-click Gmail access Apps Script gives you for free. But worry not, we’ll walk through it step by step.
Step 1: Installing Hermes + model.
Hermes runs from your terminal. This one command handles the whole install.
curl -fsSL https://hermes-agent.nousresearch.com/install.sh | bash
Here’s what you should start seeing.
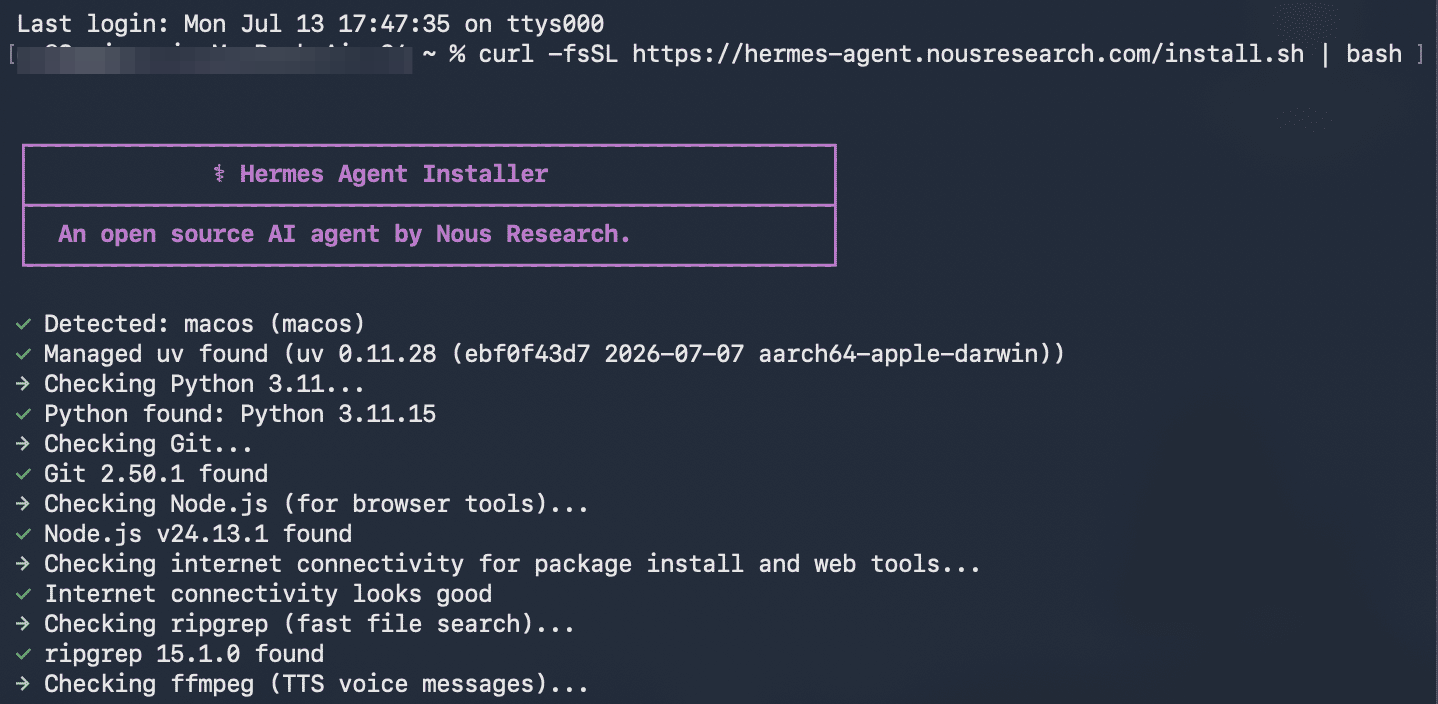
Your computer will run for a bit. Once it stops, enter this prompt.
hemes setup
Now, you’ll see the set-up wizard pop up.

You have two options:
a. Quick Setup using the Nous Portal: Choose this, and you’ll get access to Hermes-supported models for free. The catch? You’ll need to create a Nous account and enter your credit card information.
b. Full Setup: This way, you can choose a model of your choice without entering credit card details and customise your setup.
We’ll go with Full Setup today.
Next, you’ll be asked to choose a provider. Select Google AI Studio. It’s free, doesn’t need a card and is enough for what we’re building today.
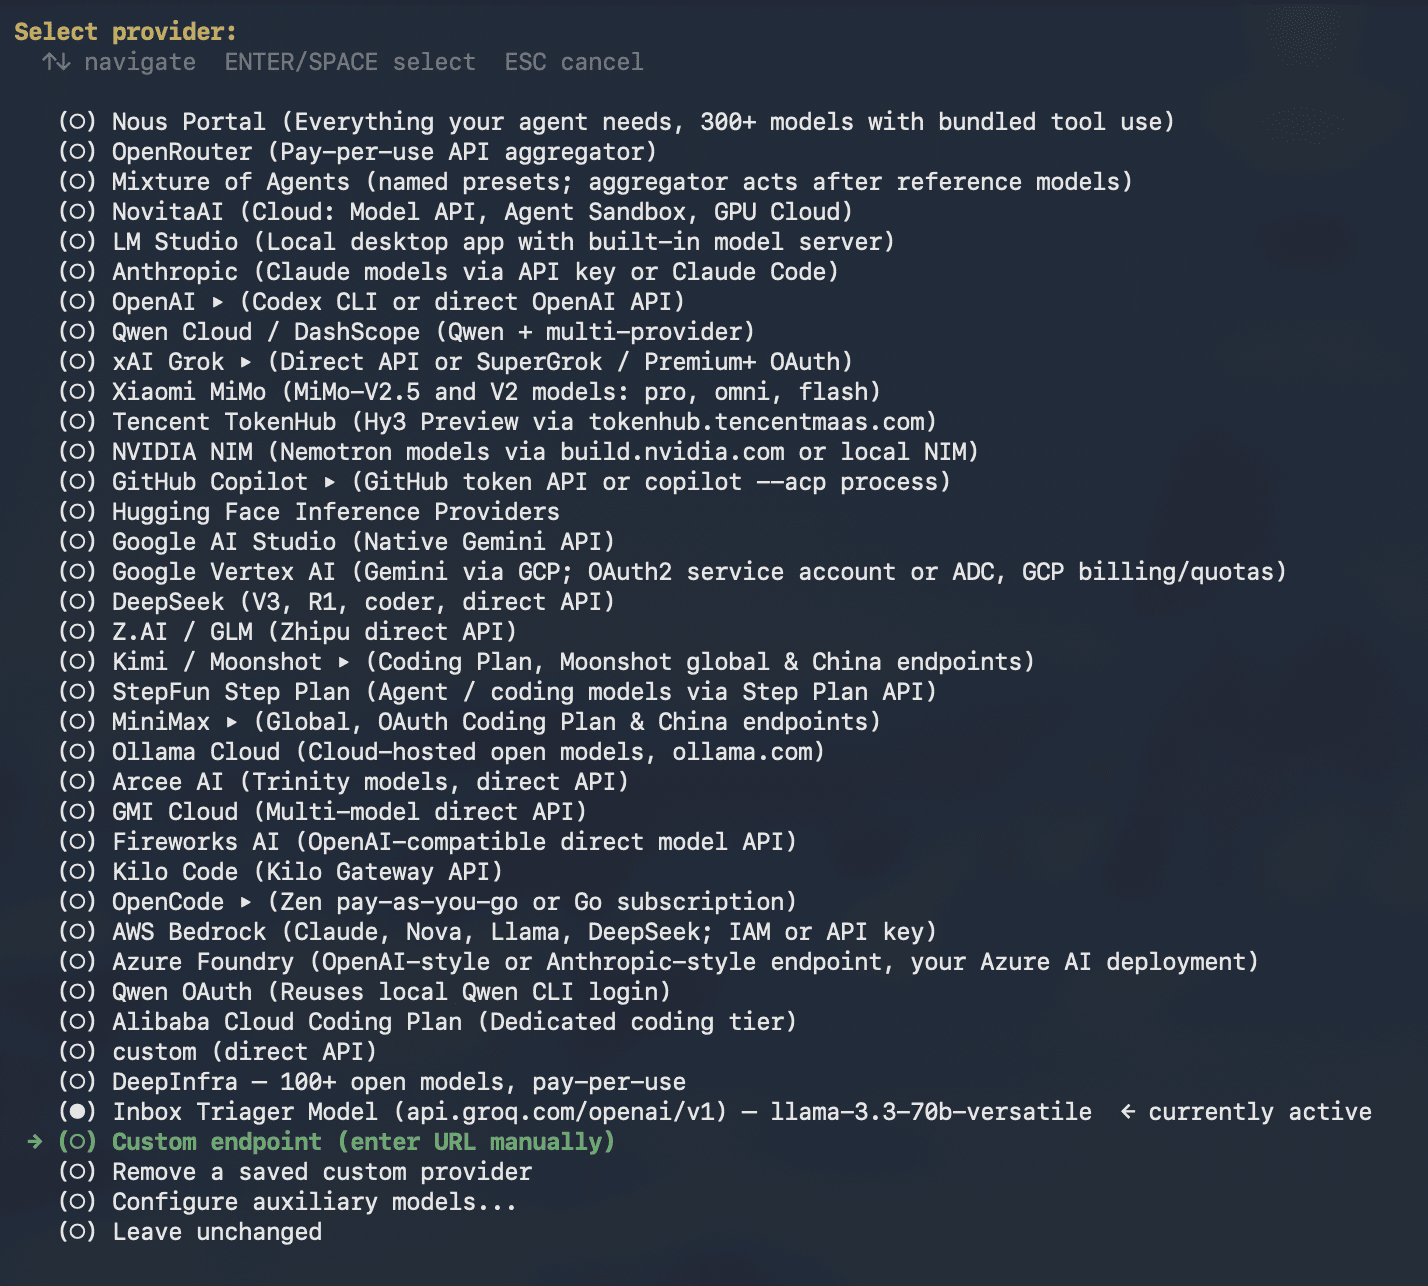
Now, you’ll be asked to enter the API key. For this:
a. Go to aistudio.google.com/apikey and sign in to your Google account.
b. Create a new API key, copy the code and enter it in your terminal.
Next, you will be asked to select a model. Check gemini-3.5-flash. This is the configuration we need for our Triage tool to work.
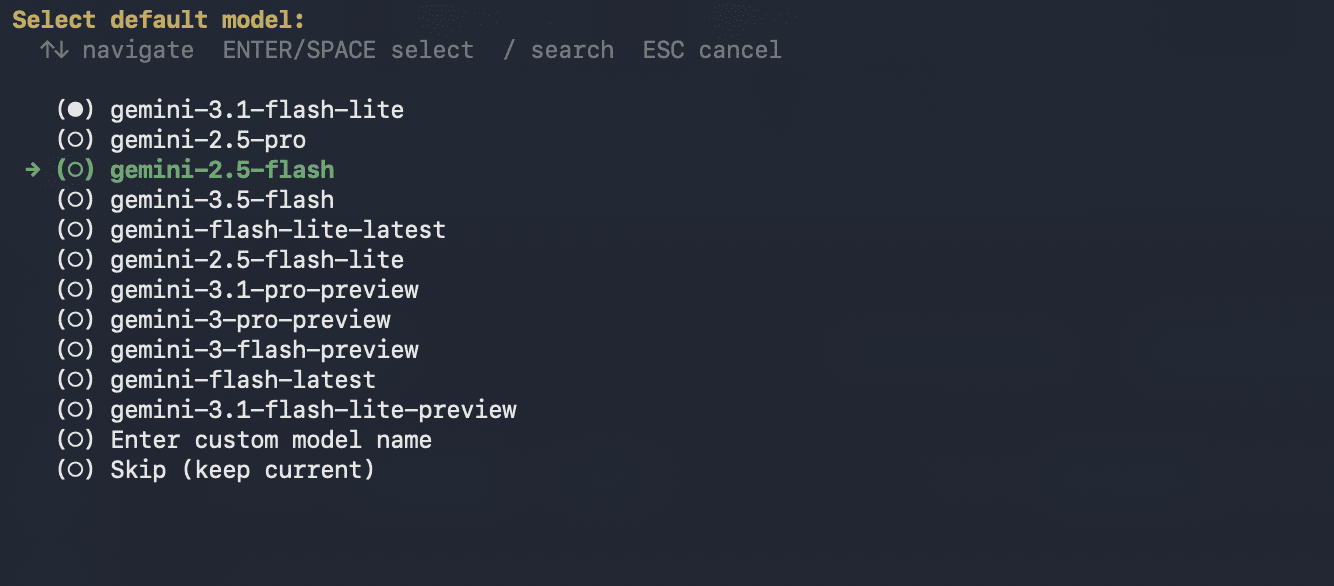
That’s it. Your basic Hermes setup is ready.
Step 2: Onboarding Hermes onto Slack.
Right after you pick a model, Hermes asks which tools it’s allowed to use: first for the CLI itself, then for each messaging platform you connect to.
Wait, what is CLI? Do we really need it?
CLI is the command line interface, or your terminal window. Configuring this will allow you to use Hermes natively within your Terminal. We don’t need this today since we’re building our Triager tool on Slack. But we’ll need to move past this flow to get to the Slack setup. Here’s what you do.
You’ll see a long checklist titled “Tools for CLI”.
Keep these checked: Terminal & Processes, File Operations, Code Execution, Memory, Cron Jobs, Skills.
The rest are unchecked. Why? Because the other options image generation, browser control, text-to-speech, etc. are for different kinds of projects. They don’t do anything for reading and sorting email, so there’s no reason to carry the extra weight.
Next, you’ll be asked to choose a terminal backend. This is where Hermes actually does the work, like reading and sorting your inbox. You have three options here:
a. Local: Here Hermes runs directly on your laptop, using its files and permissions. Runs when your laptop is active.
b. Docker: Hermes is sealed off from your computer’s files by default. Switches off with your laptop
c. Any cloud options: Hermes runs in the background 24*7.
Choosing messaging platforms.
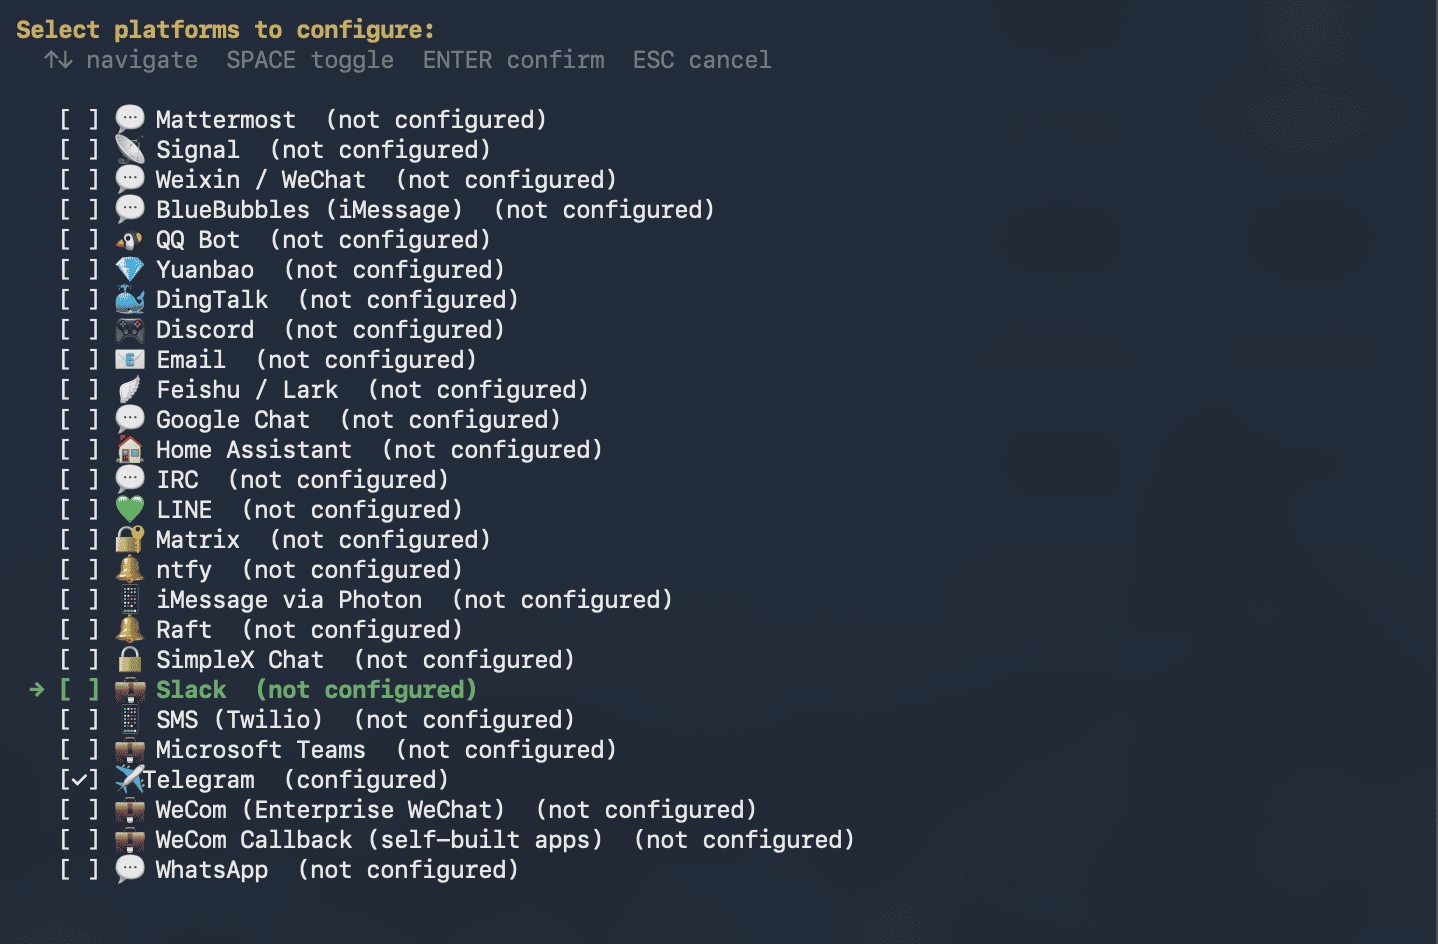
This is where you’ll configure Slack during the setup.
a. Scroll to Slack using your arrow keys. Press Space to check it and then press Enter to confirm.
b. Create the Slack app
Hermes writes a Slack app manifest to a file on your machine and gives you the path.
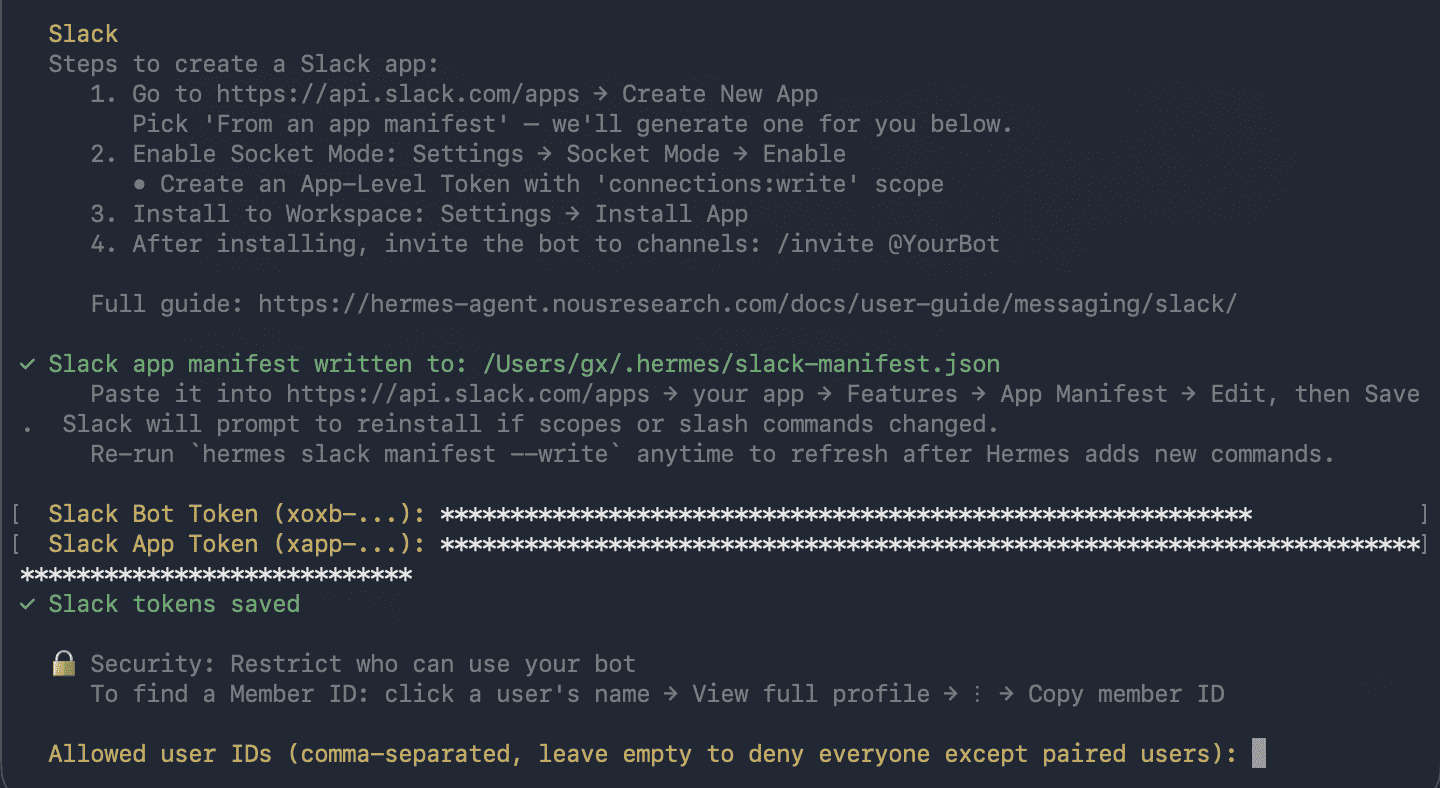
c. Find this document in your files and copy it. This is how Hermes will be set up through Slack.
Now head over to Slack.
Go to api.slack.com/apps → Create New App → From an app manifest.
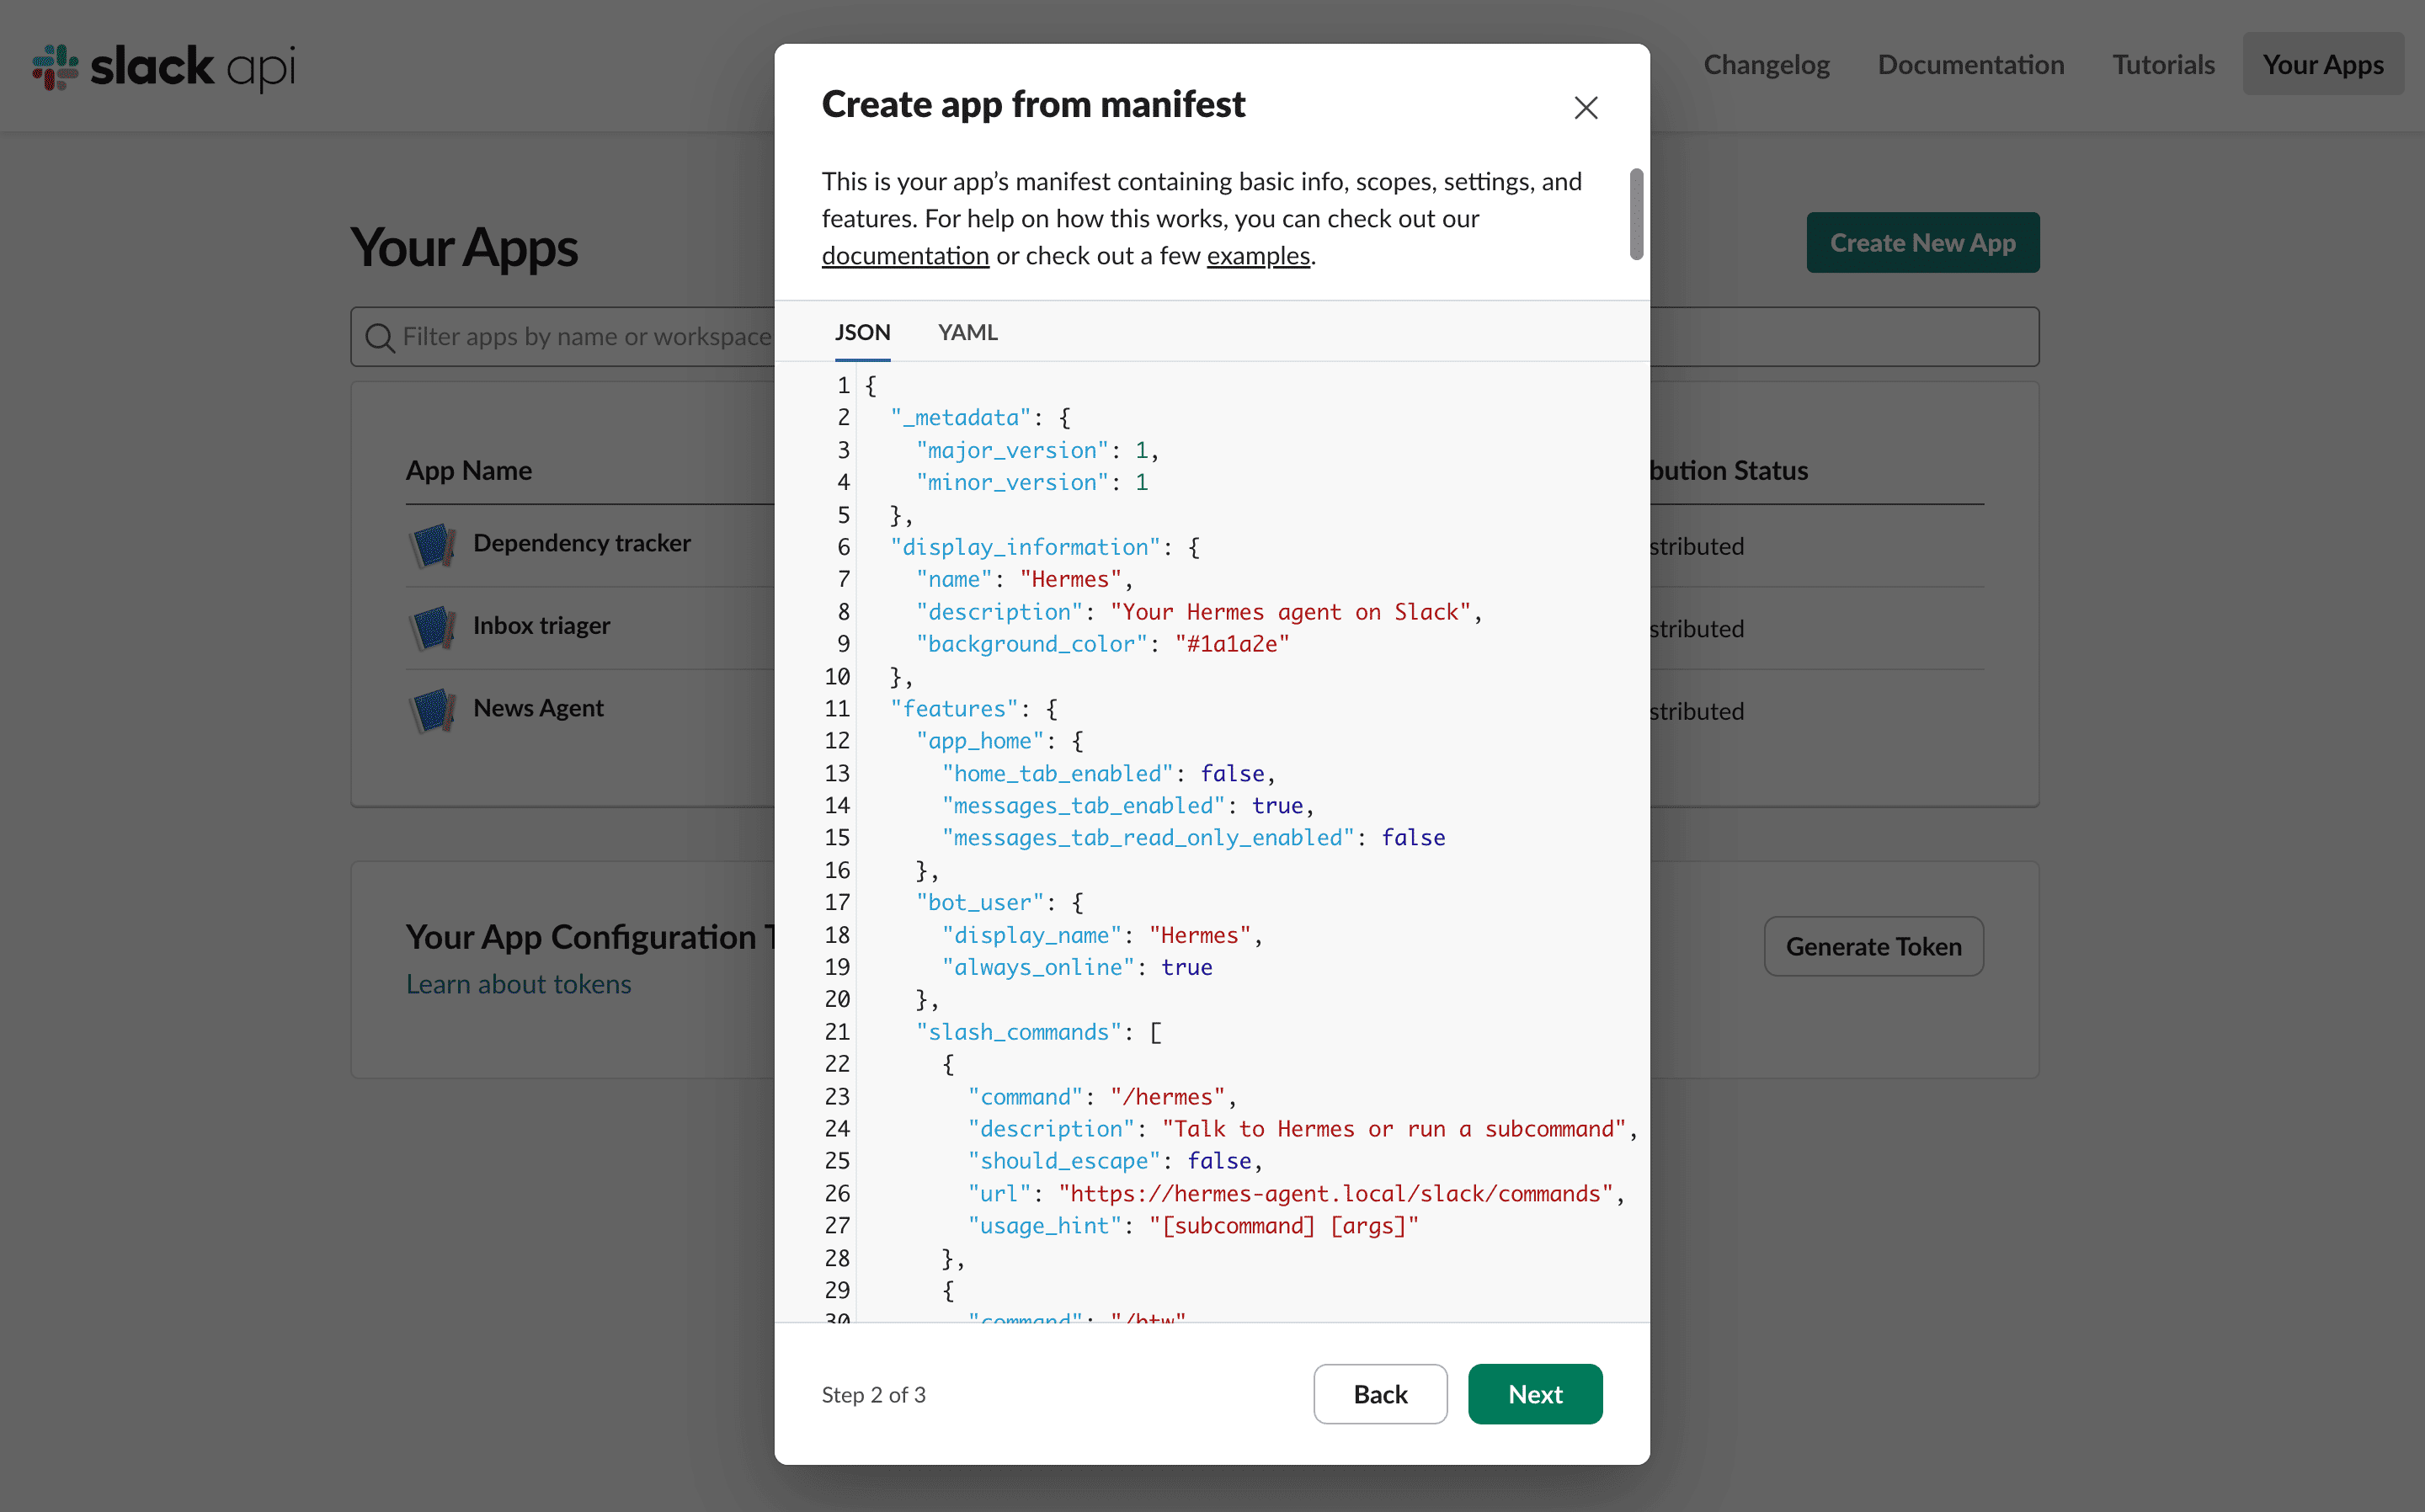
Select all the placeholder JSON shown and delete it, then paste in what you copied from your terminal. Click Next, then Create.
Get the App tokens
Go to the left-hand panel. Select Socket Mode from the dropdown.
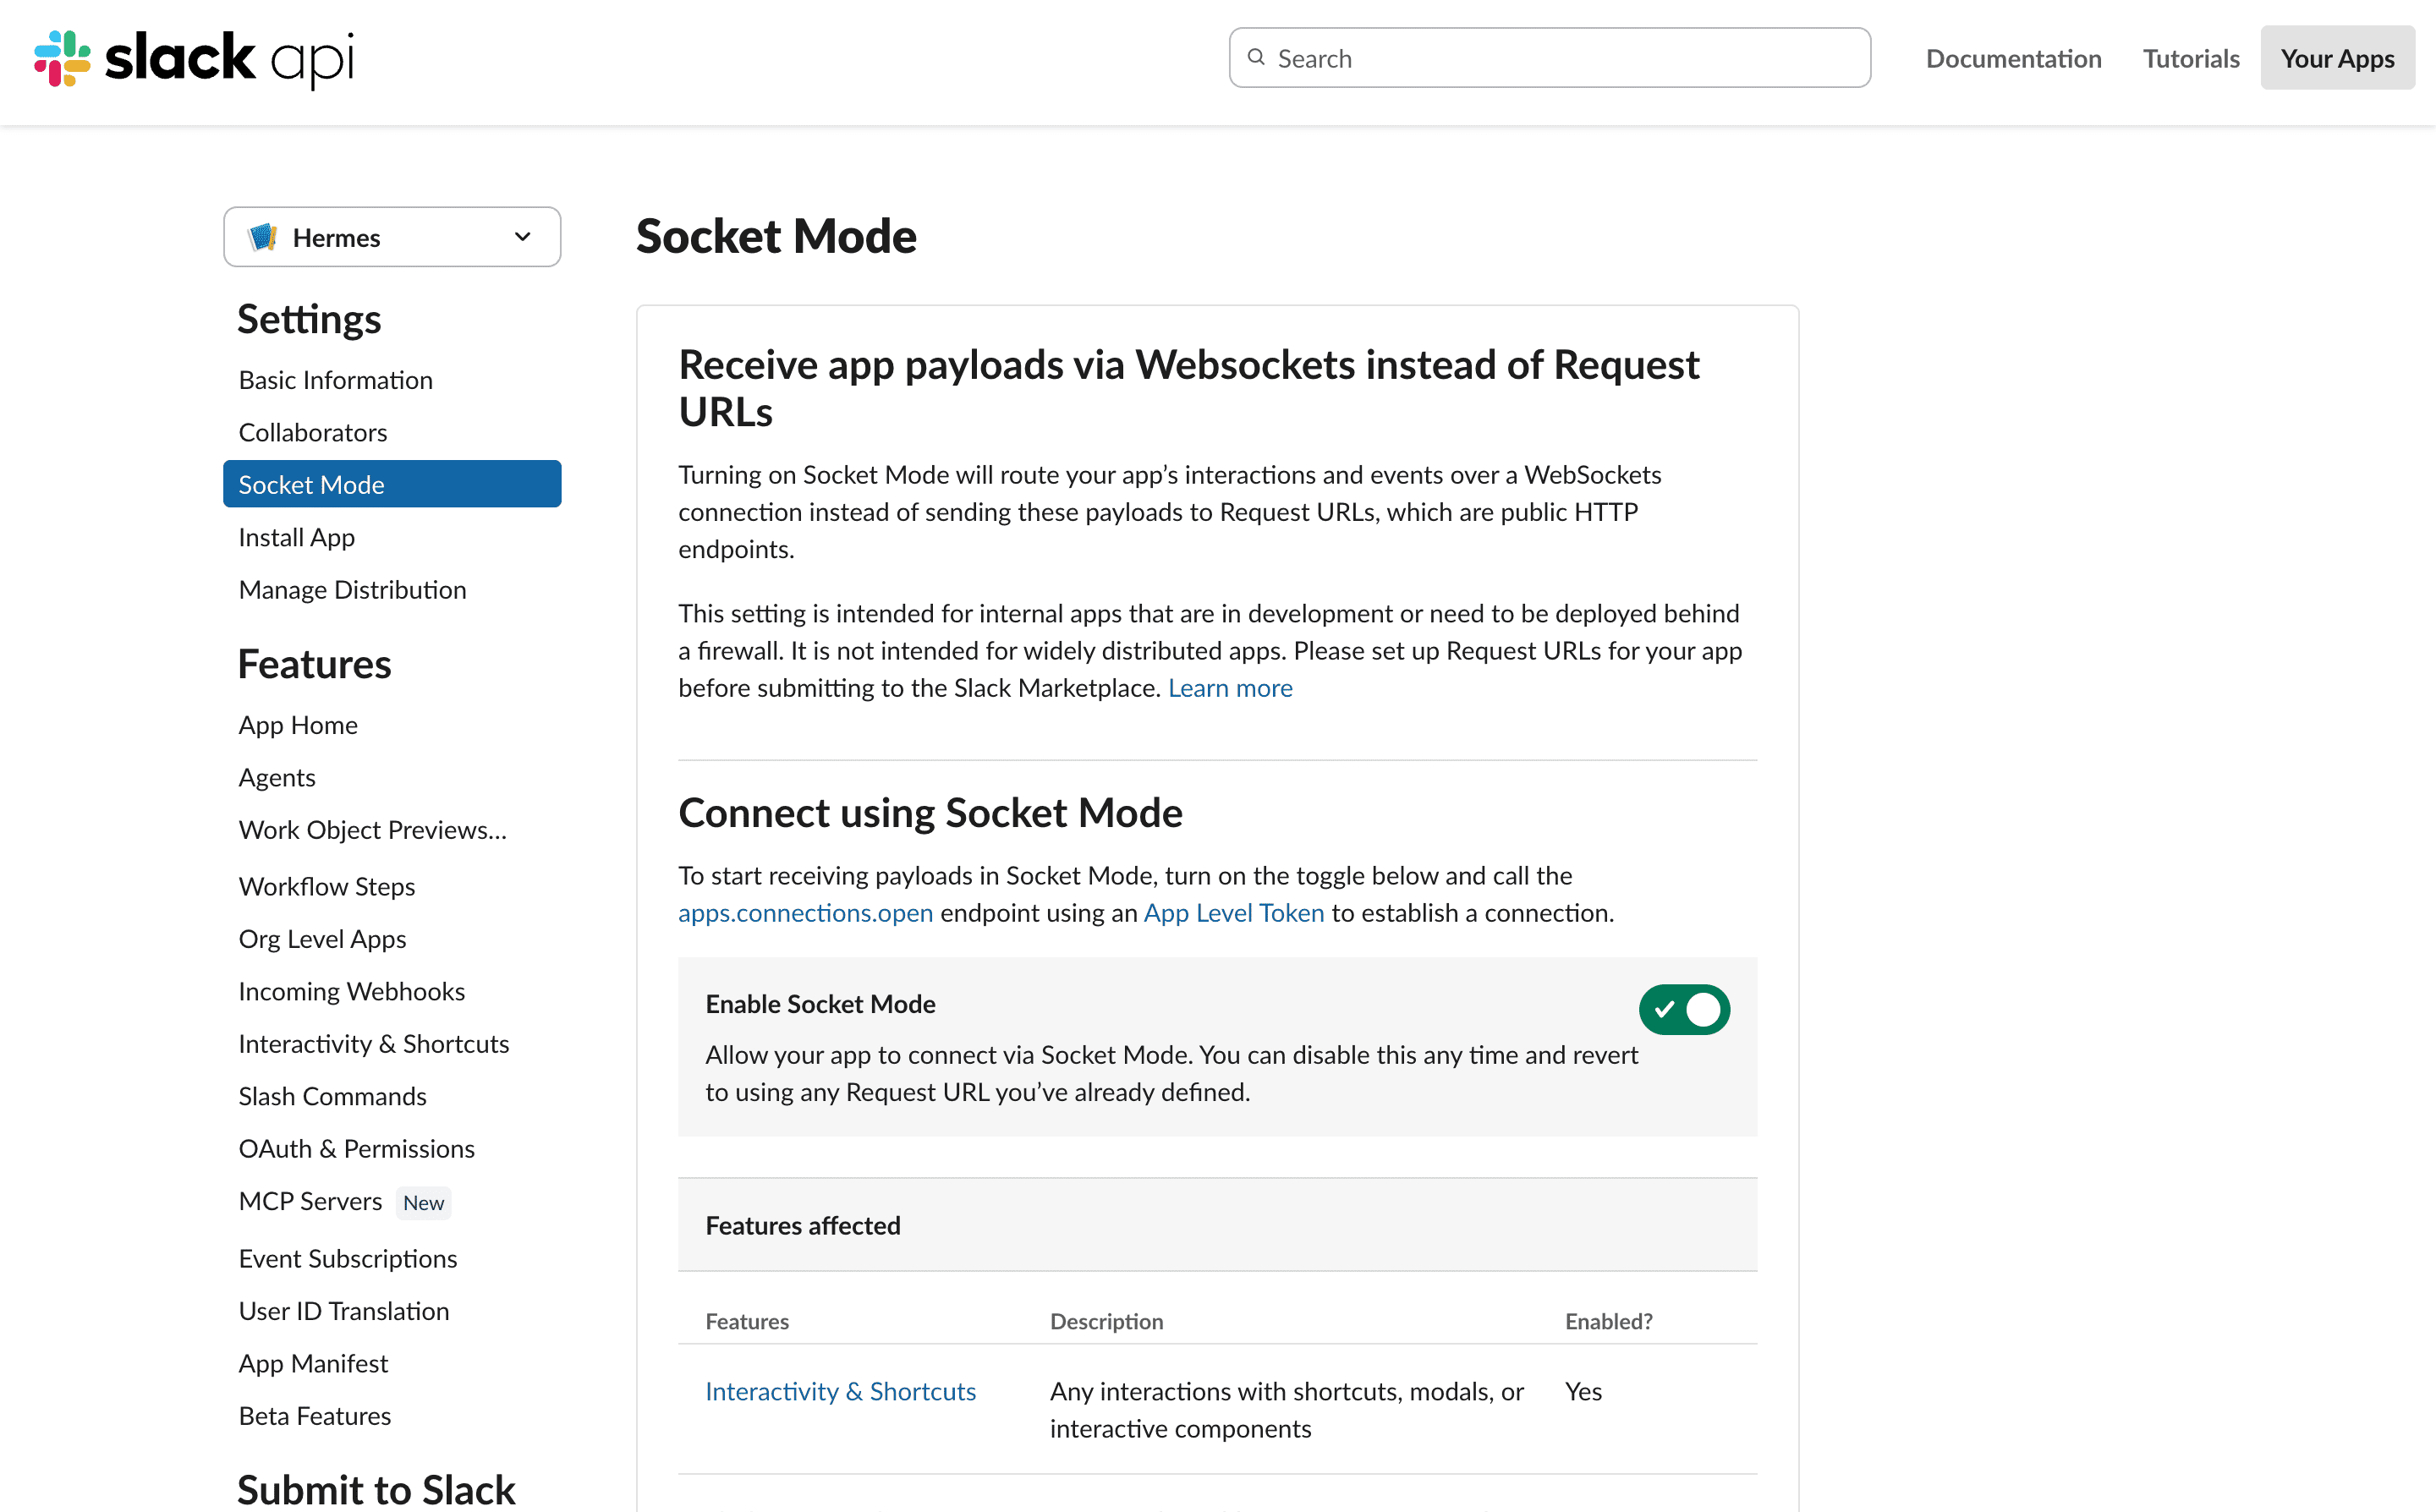
In the app’s settings, go to Socket Mode and confirm it’s enabled. This is how the Slack app and Hermes communicate directly.
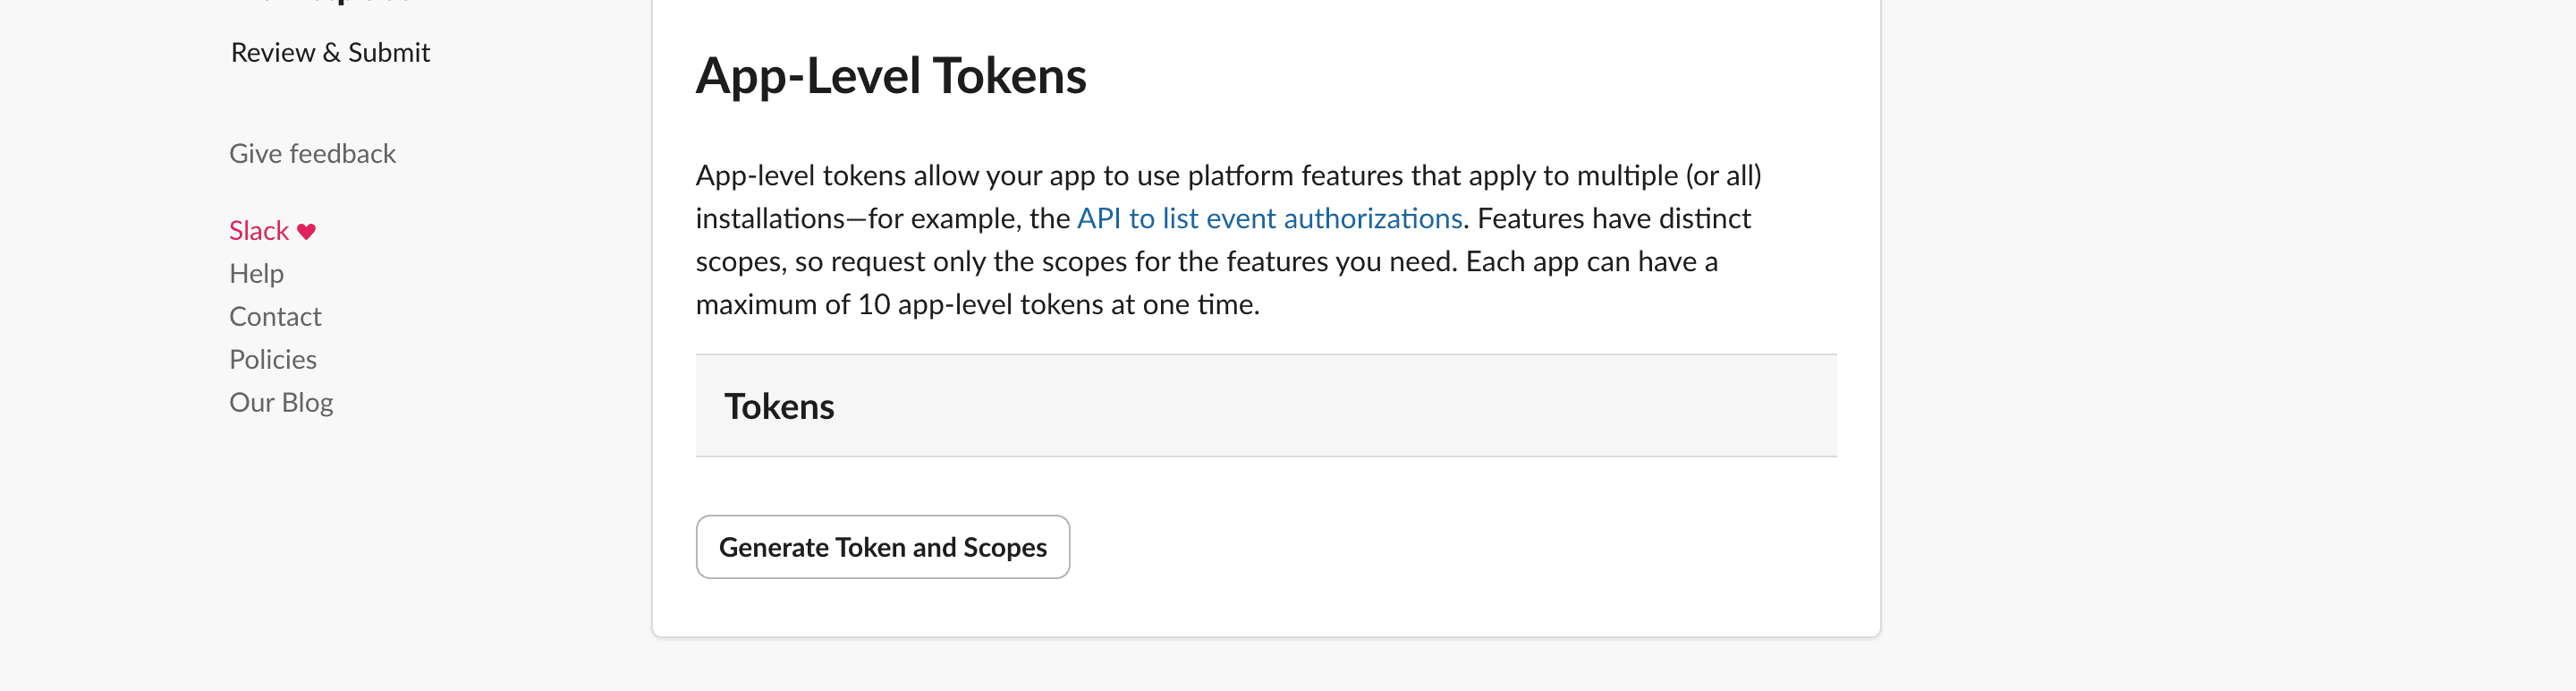
Create an app-level token.
Scroll down to Socket Mode and App-Level Token. Give it any name, and when asked for a scope, add connections:write. Click Generate. Copy the generated token to a safe place.
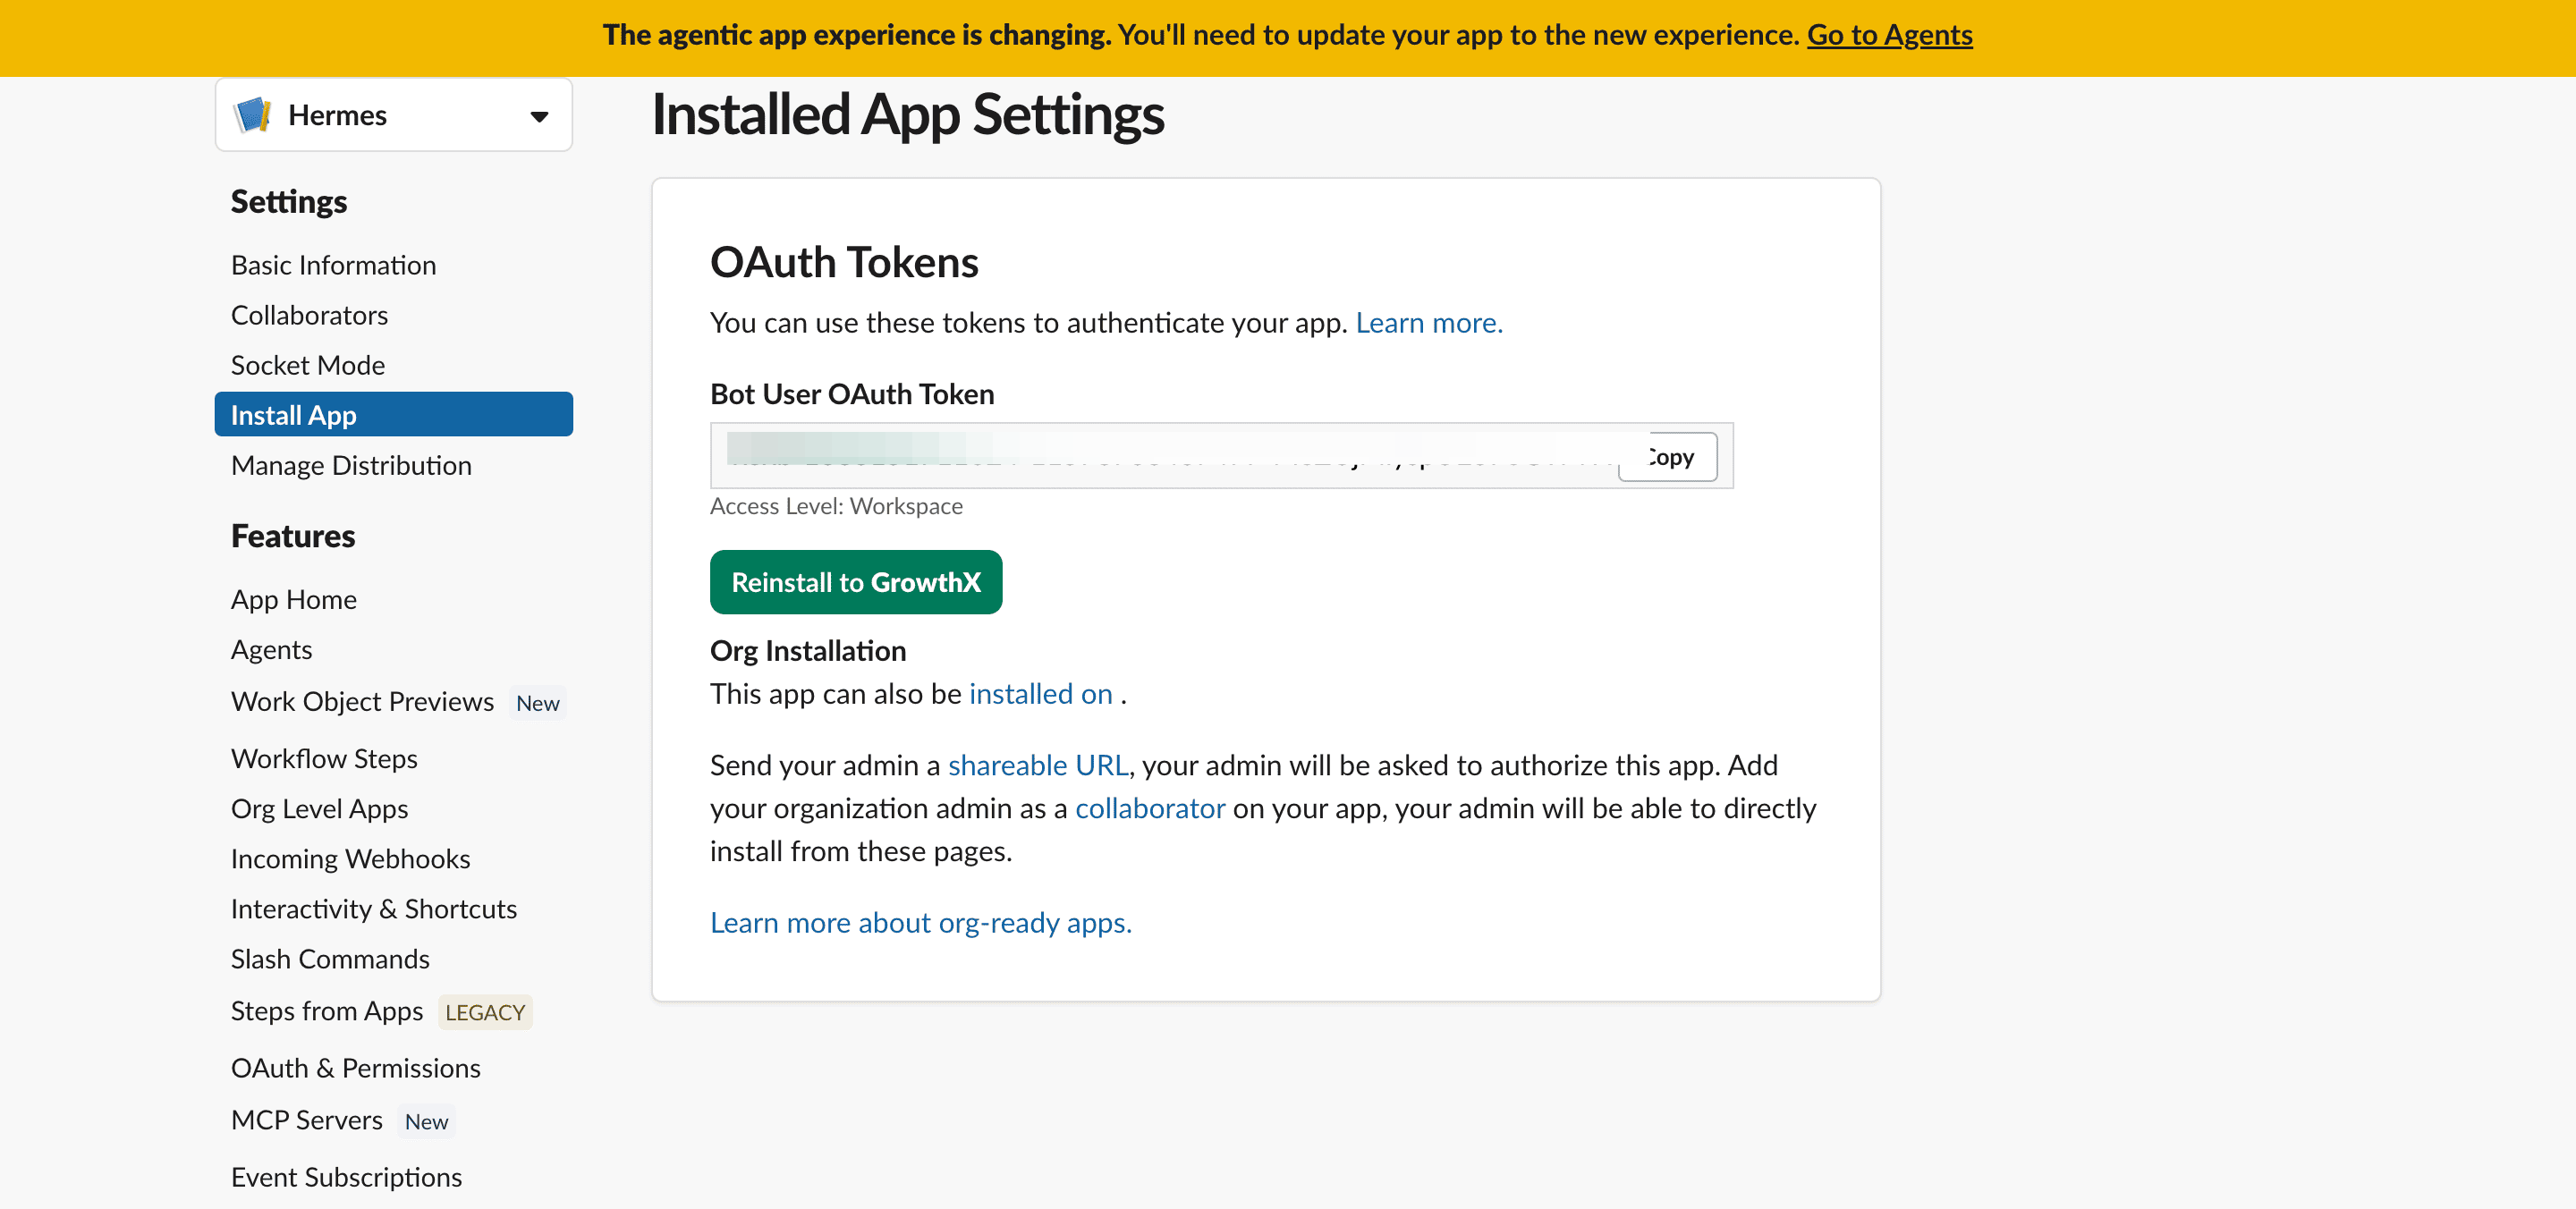
Install the app and copy your first key (Bot Token).
Click Install App in the sidebar, then Install to Workspace, then approve the permissions. On that same page, copy the token that starts with xoxb-.
Go back to the terminal.
Enter your Bot token (the xoxb- one), then the App-Level Token (paste the xapp- one).
Choose who can message the bot
You’ll be asked which Slack users can talk to this bot. Enter only your own ID, so no one else in your workspace can use it.
To find your ID:
Click your name in Slack → View full profile → the ⋮ menu → Copy member ID. It should start with U, not C — if it starts with C, you copied the wrong thing.
Decide where notifications go (Optional)
It may ask for a “Home Channel.” You can leave this blank and skip it — we’ll set it up properly later.
Turn on the always-running part
When asked if Hermes should run as a background service, choose Yes. This means Hermes keeps listening for Slack messages even when you’re not looking at the terminal.
Check point 1: Test your Hermes Slack Bot
Open the direct message with the Hermes app in Slack (not a channel, not a thread) and type “hello.” If it replies, everything’s connected correctly.
Before we continue.

You’ve got the build instinct already. Four days with us can catapult that 100x.
We’re launching the Live AI Immersion Program where you go from idea to working product in 4 days. You’ll learn to scope ideas down before you start, shape your code as you go, and know when to trust the AI and when to check it. A live product. A public repo. Real feedback. A roadmap forward. It’s all in here.
Cohort 1 begins on July 30th.
Step 3: Connecting Gmail.
Today, we will do this with Himalaya: a separate, standalone email tool Hermes can operate from the terminal. Worry not, it only reads, lists, and organises. It never sends anything unless explicitly told to. That’s exactly why we are using it.
Step 1: Generate an app password
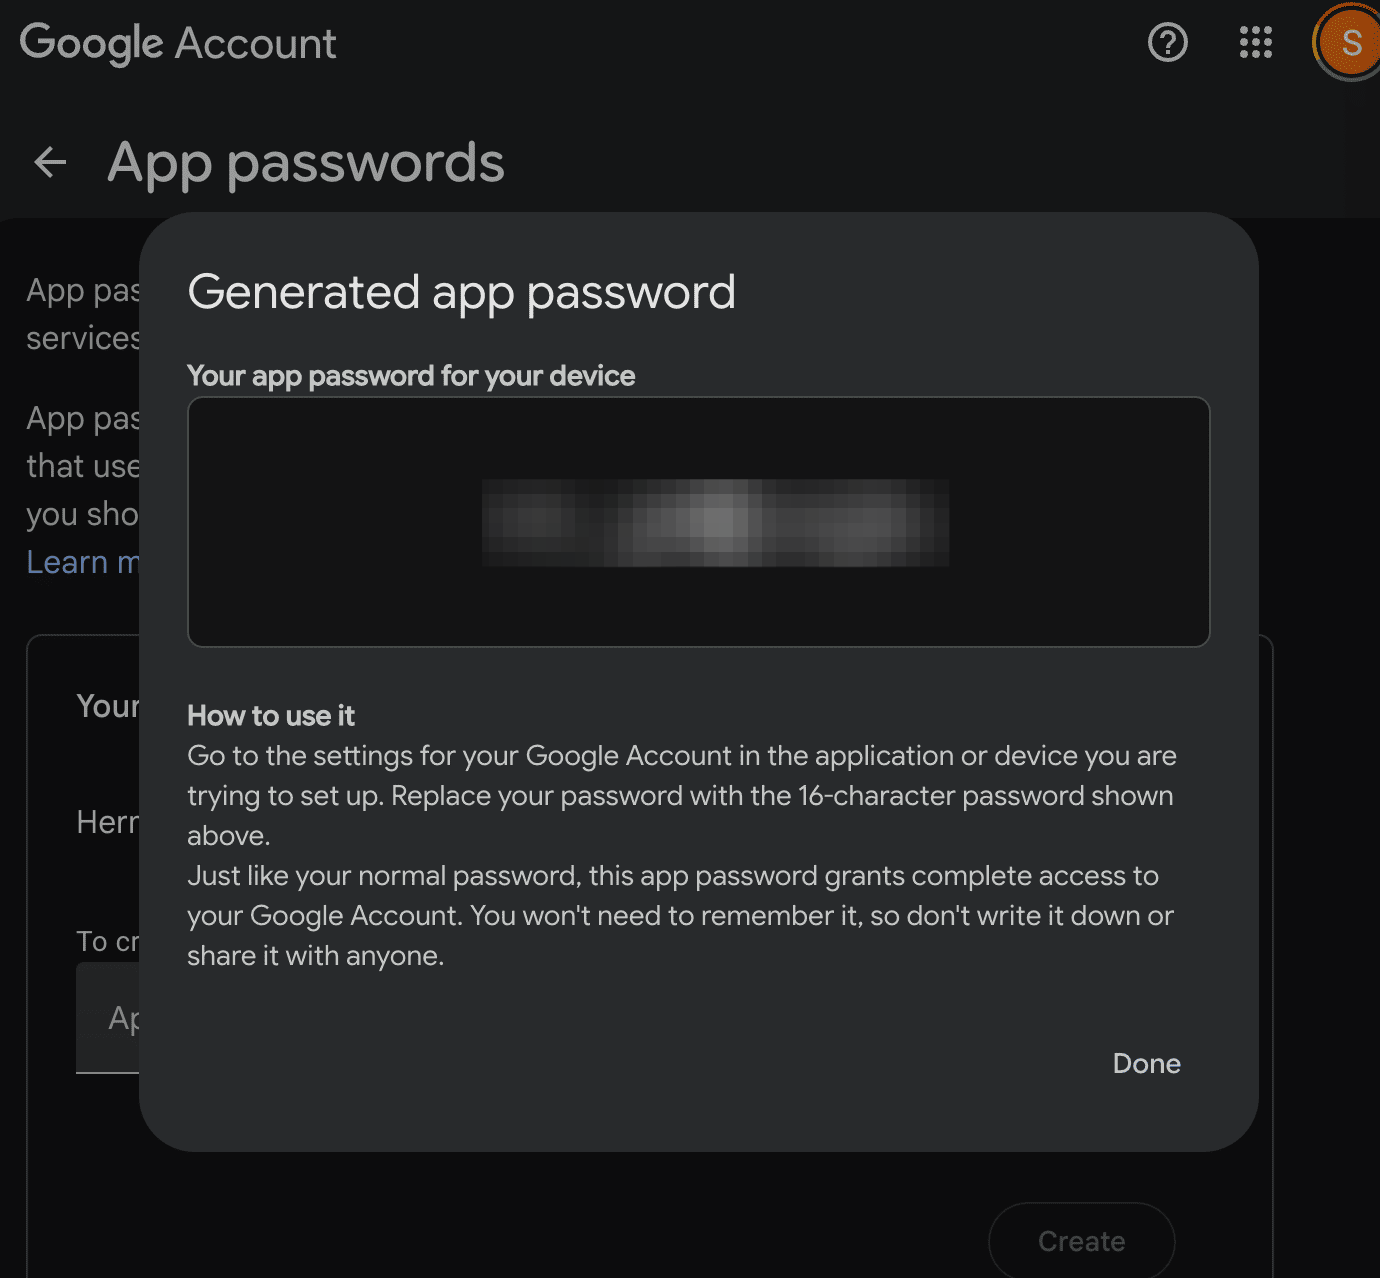
You’ll need 2-step verification turned on on your personal account to get this. How do you check? Simple: Go to myaccount.google.com/security and check. Once this is done, you should be able to set an App password on myaccount.google.com/apppasswords. You’ll get a 16-digit code. Copy it.
Note: You may not be able to set this up for your business account if your organization forbids it.
Step 2: Install Himalaya CLI
What this does: It fetches emails from your Gmail account using IMAP without the tedious process of etting it up.
Go to your terminal tab and run:
brew install himalaya
Confirm it installed correctly using this prompt
himalaya --version
Step 3: Run the setup wizard
Type this in the terminal.
himalaya account configure gmail
Now, you’ll be asked a set of questions.
Email address — your Gmail address
Account name — any nickname, doesn’t matter what you pick
Full display name — your name, or just hit Enter to skip
Downloads directory — hit Enter to accept the default, not something we need to change
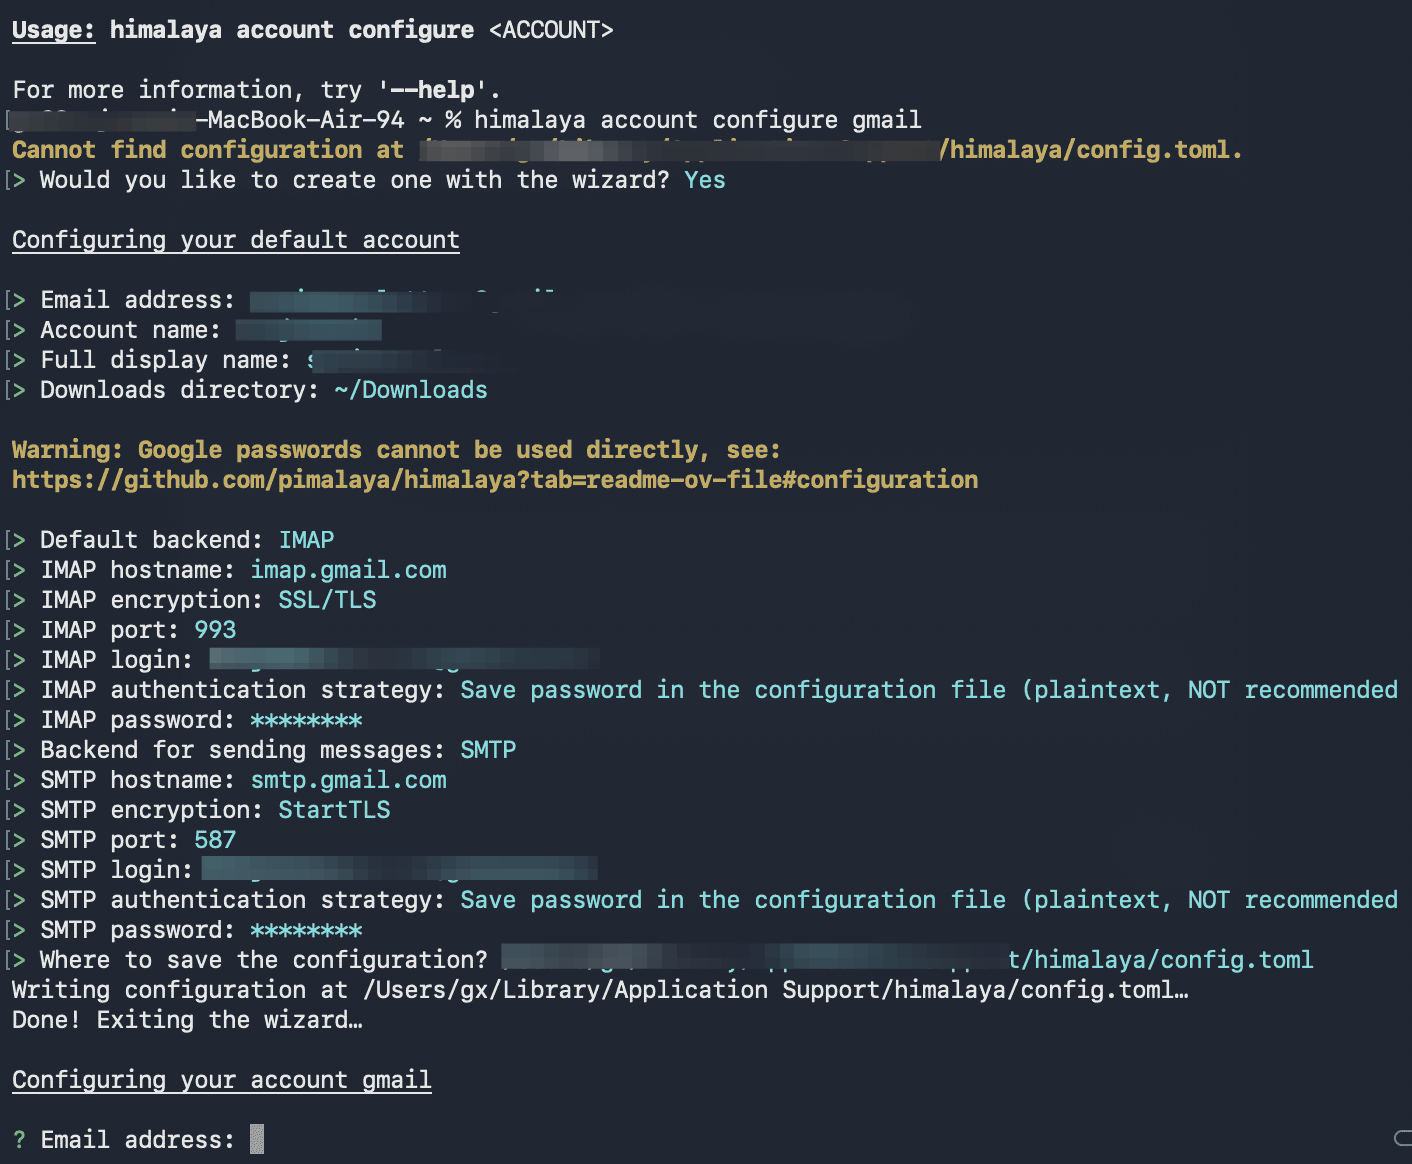
Now you’ll be asked to configure IMAP and SMTP. Both are ways to read your inbox and send email. And both setups are password-protected.
Configure both as shown in the image. And when asked for passwords, here’s what you do.
For IMAP and SMTP, enter the 16-character app password generated previously.
Store both in the configuration file (it’s easier to retrieve this way, and everything stays on your computer).
Check point 2: Test if IMAP works
Once the wizard finishes and saves your config, check that it’s really connected to your inbox:
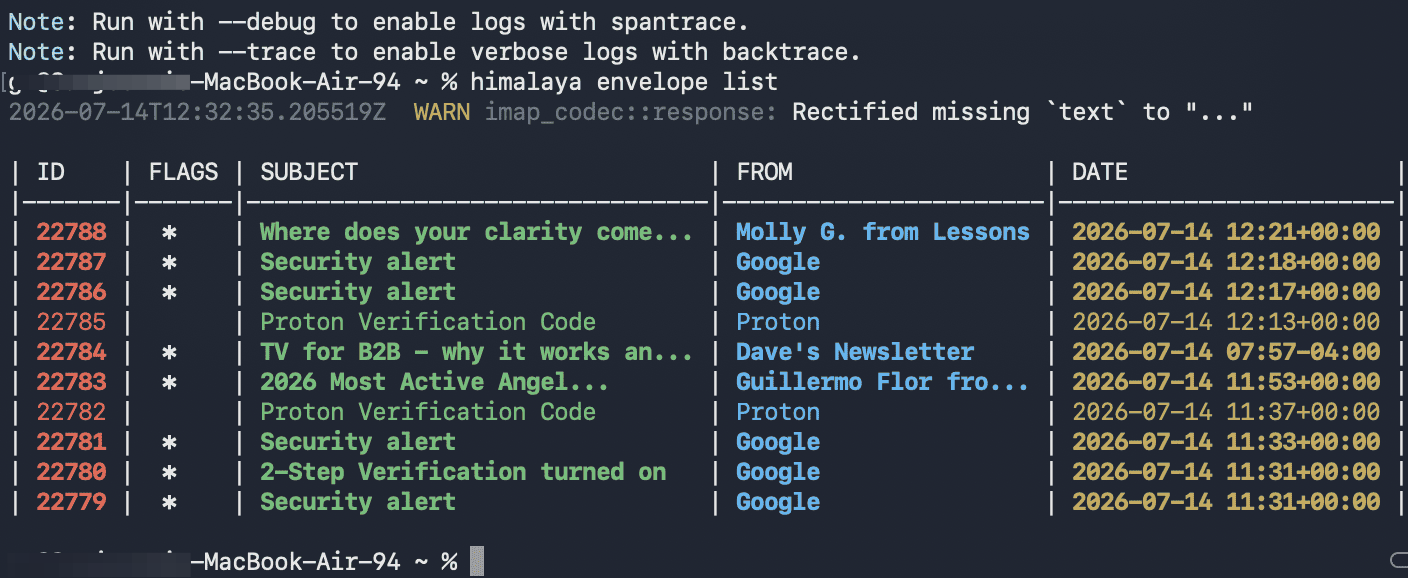
himalaya envelope list
If it worked, you’ll see a real list of your most recent emails, including subject, sender, and date pulled live from Gmail. Like this.
Step 4: Creating the labels
Labels are how your emails get sorted in your inbox. We decided to create 5 for ours.
Action needed: Urgent emails
FYI: Good to know but not urgent
Noise: Marketing newsletters
Subscriptions: Payment updates
Needs Review: Emails that don’t get neatly filtered into any of the above buckets.
Creating them is simple. Just copy this prompt into your terminal. You can change label names as you see fit.
himalaya folder create “AI-Reviewed/Action Needed”
himalaya folder create “AI-Reviewed/FYI”
himalaya folder create “AI-Reviewed/Noise”
himalaya folder create “AI-Reviewed/Subscriptions”
himalaya folder create “AI-Reviewed/Needs Review”
You should see a ‘Success!” notification in your terminal itself once the labels are created. Then you can go back to your linked Gmail account to recheck.
Step 4: Creating the Scoring skill
Creating a new skill in the right directory.
The last thing you want is to create a skill and have Hermes skip it entirely all because it was at the wrong place.
Here’s how you avoid that.
Hermes skills live at ~/.hermes/skills/<skill-name>/SKILL.md. We’ll create a folder and file here with this command.
mkdir -p ~/.hermes/skills/inbox-triage
Now we’ll add this content to the skill folder with the following command.
---
name: inbox-triage
description: Classify unread inbox emails into buckets and urgency tiers, label and file them via Himalaya, and Slack-ping only on High urgency.
version: 1.0.0
---
# Inbox Triage Skill
You are a terse, sharp chief-of-staff triaging a busy person’s inbox. You do not waste words.
## What to do
Process at most 15 unread emails per run, oldest first. If more than 15 are unread, only handle the first 15 — the rest will be picked up automatically on the next hourly run, since anything already marked seen is never reprocessed.
For each unread email in the inbox:
1. Read the sender, subject, and body.
2. Classify into exactly one category:
- “Action Needed” - requires a reply, decision, or action from the recipient.
- “FYI” - informational, no action needed, but relevant to their work.
- “Noise” - irrelevant, low-value, or an automated notification with no informational value.
- “Subscriptions” - newsletters, digests, mailing list content, recurring subscription emails.
- “Delivery Updates” - shipping, tracking, order confirmations, order bookings, out-for-delivery notifications, and delivery status updates.
- “Needs Review” - use this instead of any of the above if you are not confident in the classification. Do not guess; route uncertain cases here.
3. If you classified into Action Needed, FYI, Noise, or Subscriptions, also score urgency:
- “High” - needs attention today (deadline, blocker, direct ask from someone important, time-sensitive).
- “Medium” - needs attention this week, not urgent.
- “Low” - no real time pressure.
Needs Review and Delivery Updates do not get an urgency score.
## What to do with each classification
- Action Needed / FYI / Noise / Subscriptions / Delivery Updates: move the email into its matching label folder (this removes it from the inbox).
- Needs Review: copy the email into the Needs Review label folder (this keeps it in the inbox).
Use himalaya to do this:
- To move: himalaya message move “AI-Reviewed/<category>” <id>
- To copy: himalaya message copy “AI-Reviewed/Needs Review” <id>
## Marking as processed
After moving or copying an email, mark it as seen so it is never reprocessed:
himalaya flag add --flag seen <id>
This applies to all five categories, including Needs Review — otherwise the same email gets reclassified every run.
## Pacing
Process emails one at a time, not in parallel. Wait a few seconds between each email’s classification to avoid hitting the model provider’s rate limit. If you receive a rate limit error, wait the time it specifies before retrying. Do not give up after a few attempts.
## Notifications
## Notifications
If, and only if, urgency is High: send a Slack message with the sender, subject, and a one-sentence summary under 20 words, written in your terse chief-of-staff voice.
If no email this run was classified High urgency, respond with only [SILENT] and nothing else. Do not summarize what you filed.
## Rules
- Never reply to, forward, or delete anything.
- Never invent information not present in the email.
- If genuinely unsure between two categories, choose Needs Review rather than guessing.
Next, confirm if the skill was genuinely added with this command in the terminal.
cat ~/.hermes/skills/inbox-triage/SKILL.md
You should see the entire skill file in your terminal.
Added a fifth option: “not sure.” At first, every email had to land in one of four buckets, confident or not. We asked: what happens when it guesses wrong? So we gave it an out — if it’s not confident, file it under “Needs Review” instead of forcing a call.
Handle one email at a time: The tool fired off requests too fast, hit a rate limit, and gave up. So we added a simple rule: handle one email at a time, wait a bit between each, and don’t quit after one failed attempt.
Made sure it doesn’t check the same email twice: Emails that get moved out of the inbox are automatically safe — they’re gone, so they won’t get picked up again. But “Needs Review” emails stay in the inbox on purpose, which means without telling the tool to mark them as “already looked at,” it would re-read and re-sort the same email every single hour, forever.
Told it to stay quiet when there’s nothing urgent: Originally, every run sent a little summary to Slack. Fine once — annoying every hour. So now: only speak up if something’s actually urgent. Otherwise, say nothing.
Never reply to or delete anything: It only reads and sorts. And never make up details about an email it wasn’t sure about — better to flag it as unclear than confidently get it wrong.
Step 5: Make the triage tool fire every hour
Head to your Hermes chat on Slack and type this.
Create a cron job named “Inbox Triage” that runs every hour, uses the inbox-triage skill, and delivers its output to this chat.
Check point 3: Run a test.
You can test the triage logic itself directly in Slack — just know this method won’t test the [SILENT] behaviour, since that’s cron-specific plumbing that only activates via a real cron trigger, not in chat.
In the actual Hermes DM (click Hermes under Apps), send:
Run the inbox triage skill on my 5 most recent unread emails.
What to watch for in the reply:
It should tell you what it classified and where things got filed — that’s expected here, since this is a normal chat response, not a cron delivery.
Check whether it followed the 15-cap rule correctly (it should say 5 or fewer, since you asked for 5).
If anything’s High urgency, it should describe it clearly.
Then verify in Gmail directly — open the labels in your browser, confirm the emails actually moved/copied to the right folders, matching what it just told you.
And there you have it.
Go build this tool. Point it at your own inbox, watch what it gets right, watch what it gets wrong, and fix the rubric until it doesn’t. Then tell us what broke — reply to this email; we read every one. If your version of this looked different from ours, we’d love to hear that too.
Want to plug your brand into our newsletter?
Email us at collab@growthx.club
