

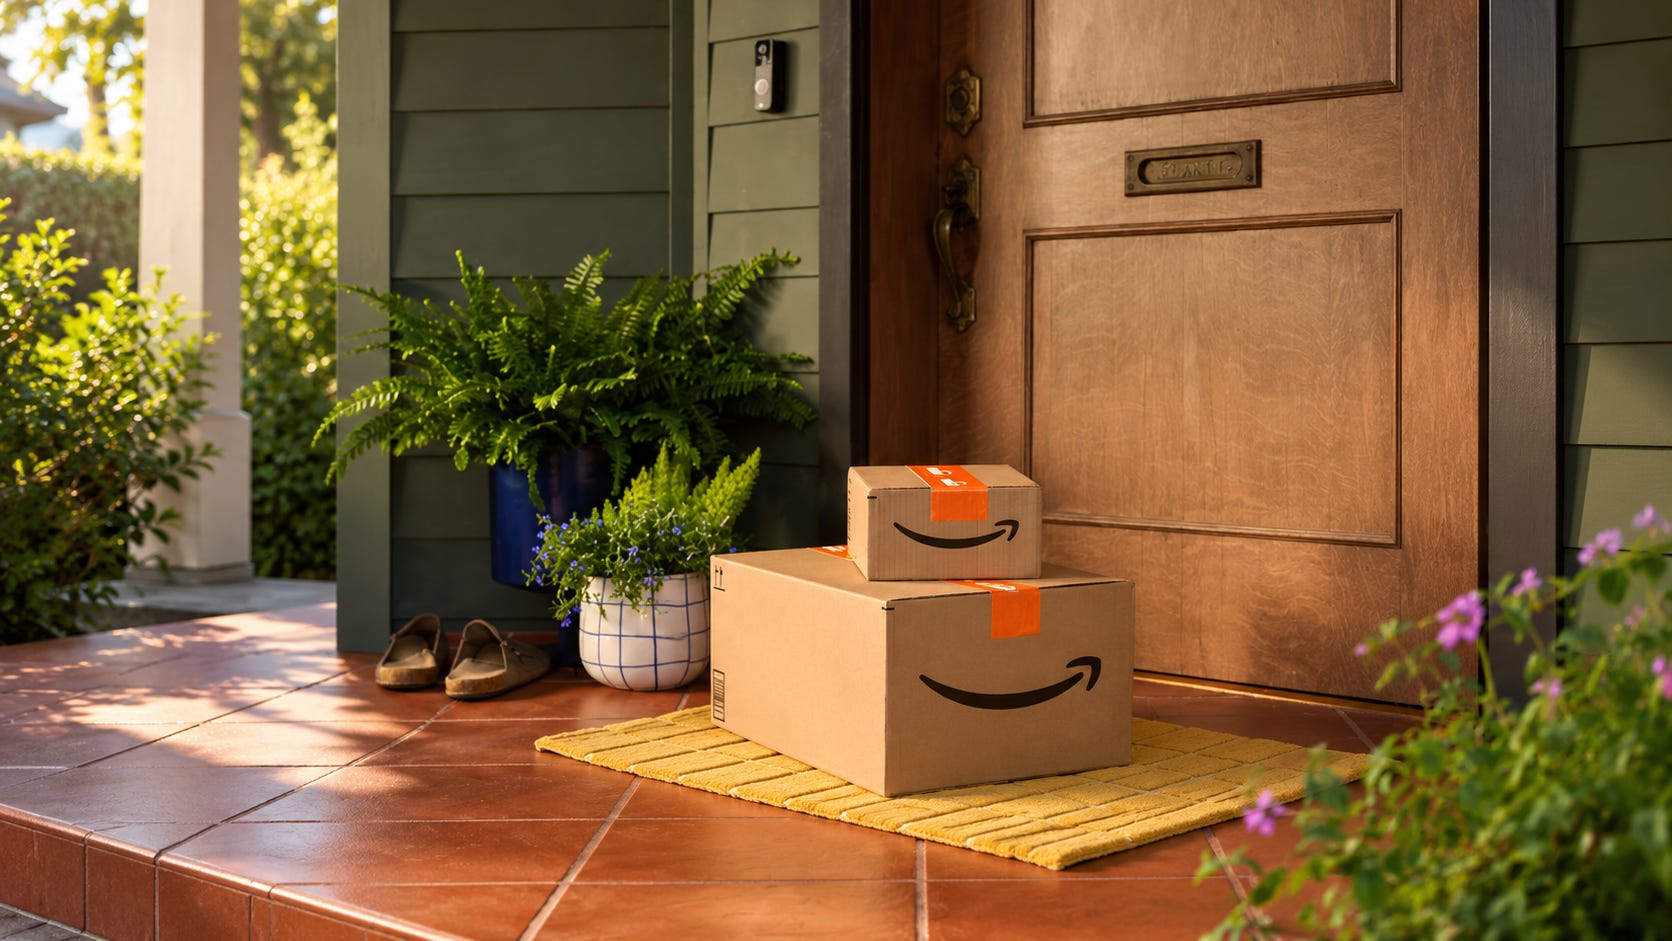
Imagine ordering a ₹1,200 product online. The delivery person arrives while you’re at work. You miss the call, and the package heads back to the seller.
Now you have to wait three days for someone to send it again. On yet another weekday. Meanwhile, sellers burn ₹180–₹240 in shipping on every undelivered order.
This week, we’ll try building our own AI agent that calls customers, finds out why delivery failed, and collects the information needed to recover the order.
Let’s see how far we can get.
What should our AI agent actually do?
When a courier cannot deliver an order, it raises a Non-Delivery Report (NDR). Sometimes the customer isn’t home. Other times, the delivery address is incomplete.
A quick conversation can solve both problems. For V1, let’s focus on two situations.
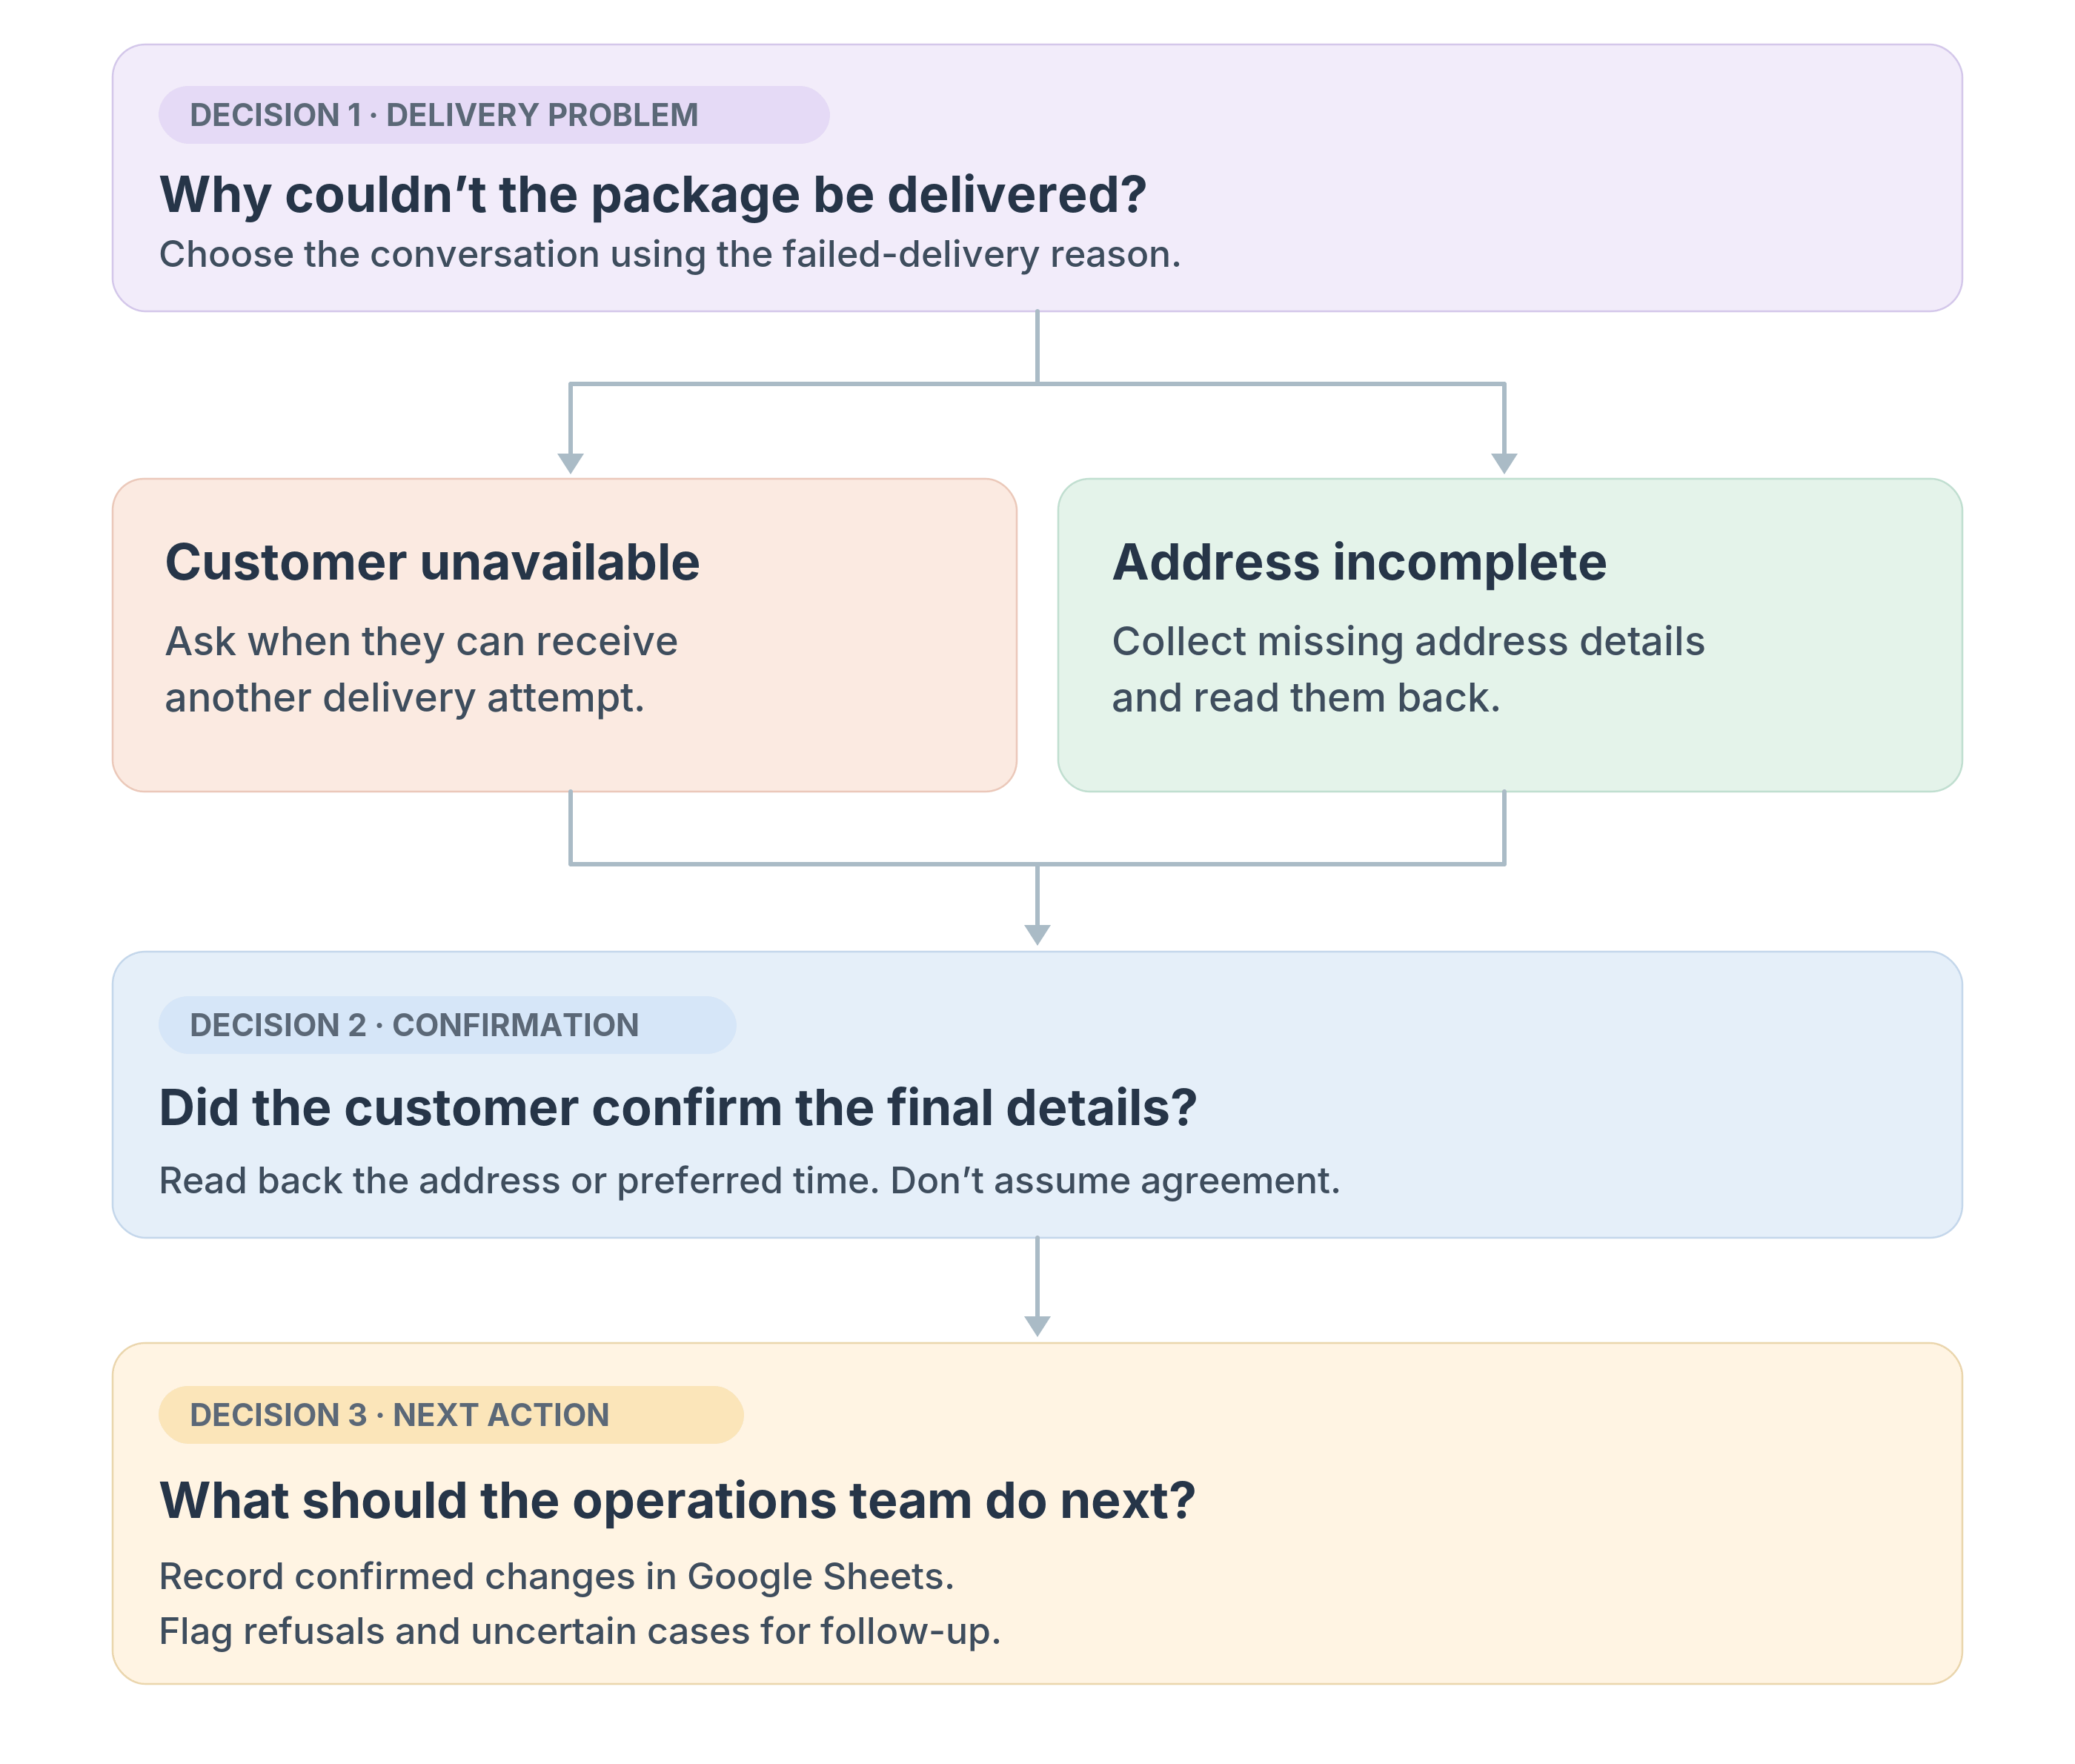
If the customer no longer wants the order, our agent should record that too. We don’t want it repeatedly calling someone who’s already declined delivery. Here’s the stack we’ll build with today.
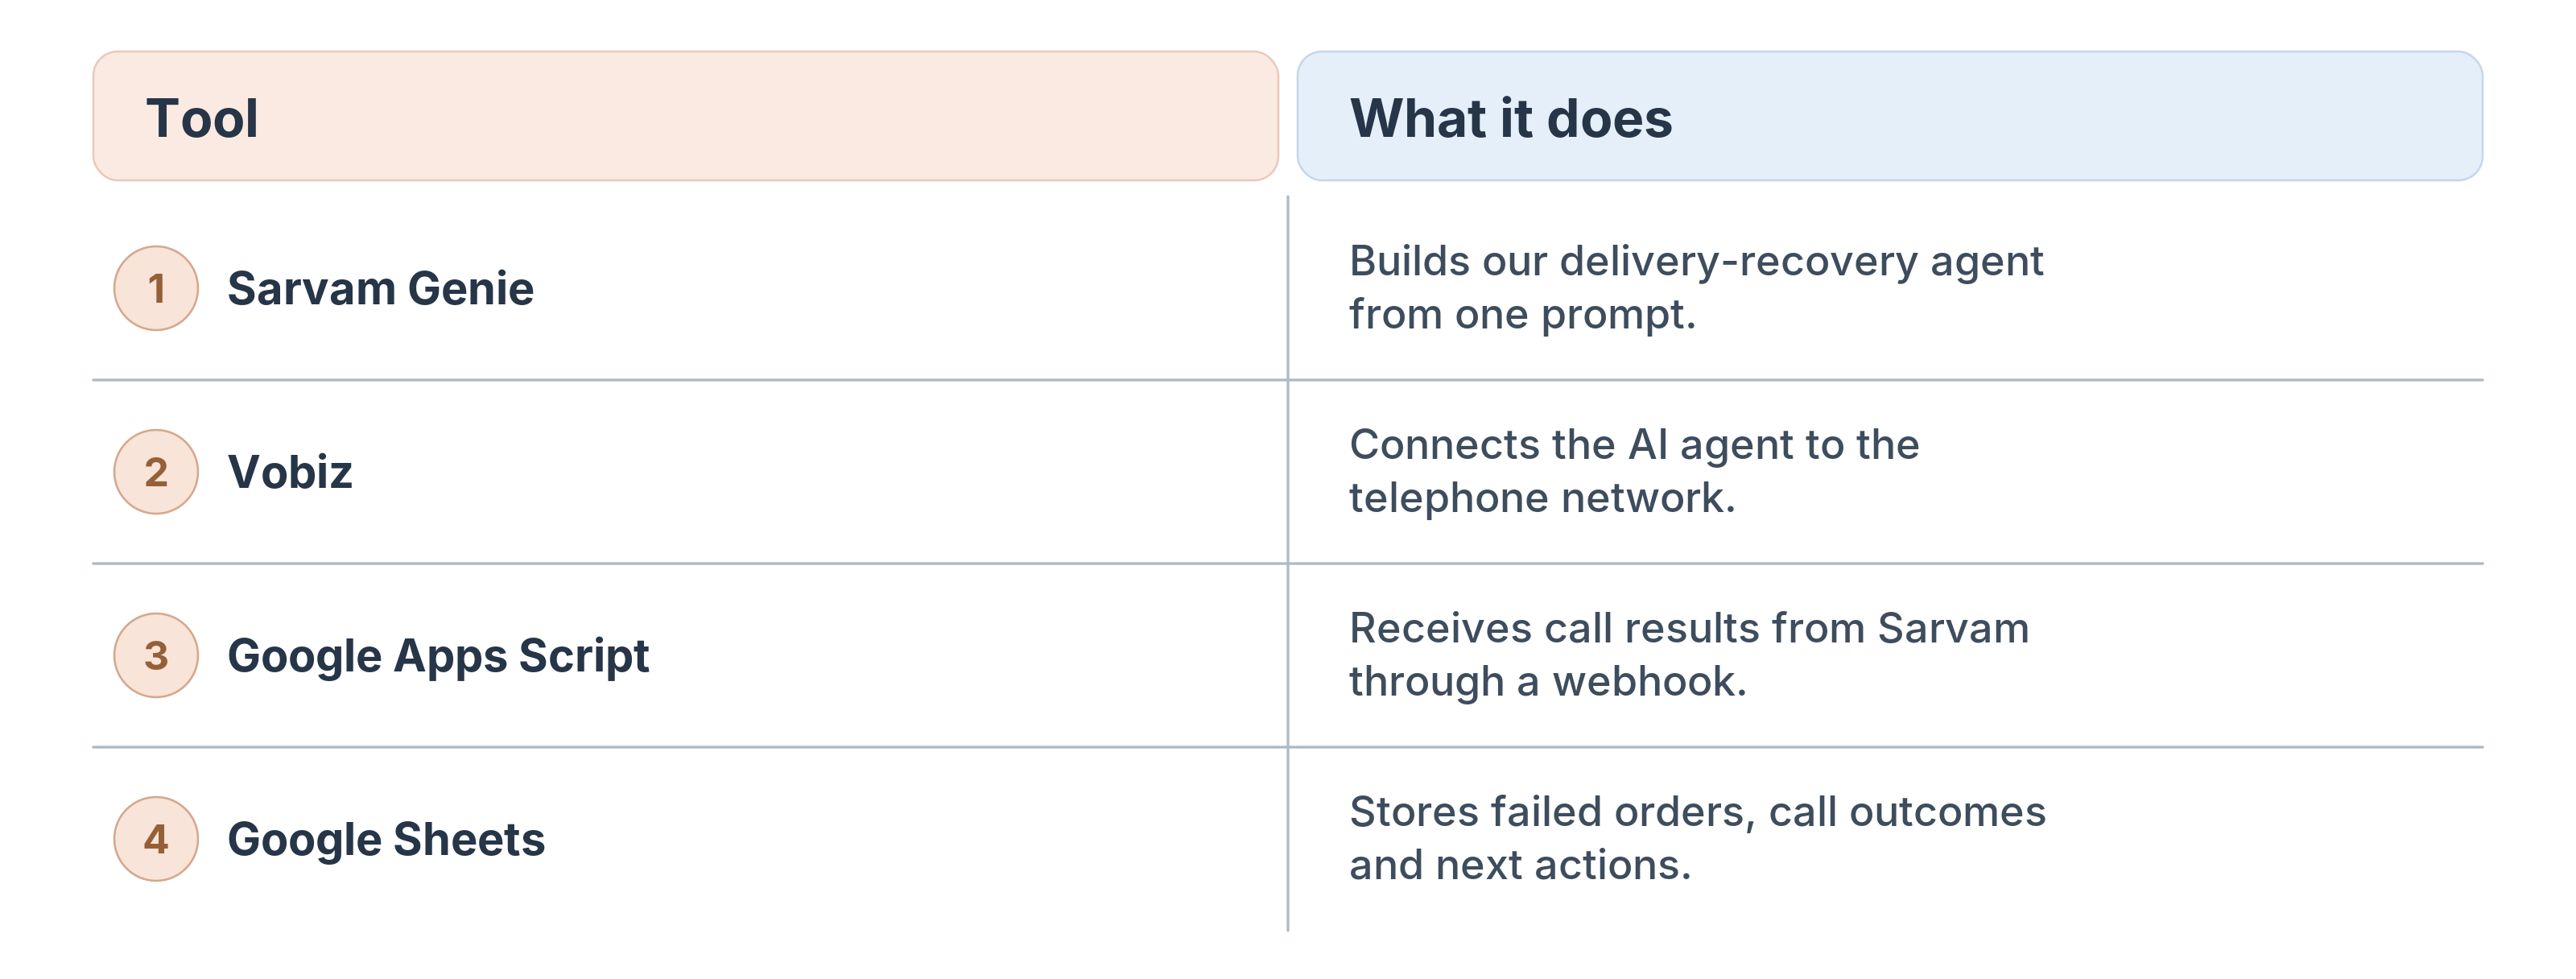
For now, Google Sheets will act as our delivery-management system. We’ll use it to track failed orders and call outcomes. The seller can then use those details to request another delivery attempt from the courier.
#1. Get a phone number.
Today, we’re keeping things simple.
We’ll use Vobiz to get an Indian phone number and connect it to Sarvam AI through their direct integration. That way, we don’t need to manually configure SIP trunks or build a WebSocket server (we tried).
Vobiz handles the calling in under 5 minutes of setup, while Sarvam lets us customise how our AI agent speaks, asks questions, and conducts conversations.
Newsletter readers get ₹2,500 in free Vobiz credits with code GROWTHXNL-63WEHB. That’s credits you can use for the number + calls.
Get your number.
Open the Vobiz Console and create an account.
Navigate to Numbers → Buy new number.
Select a voice-enabled Indian number.
Complete the purchase. We used the code and got our number for free.
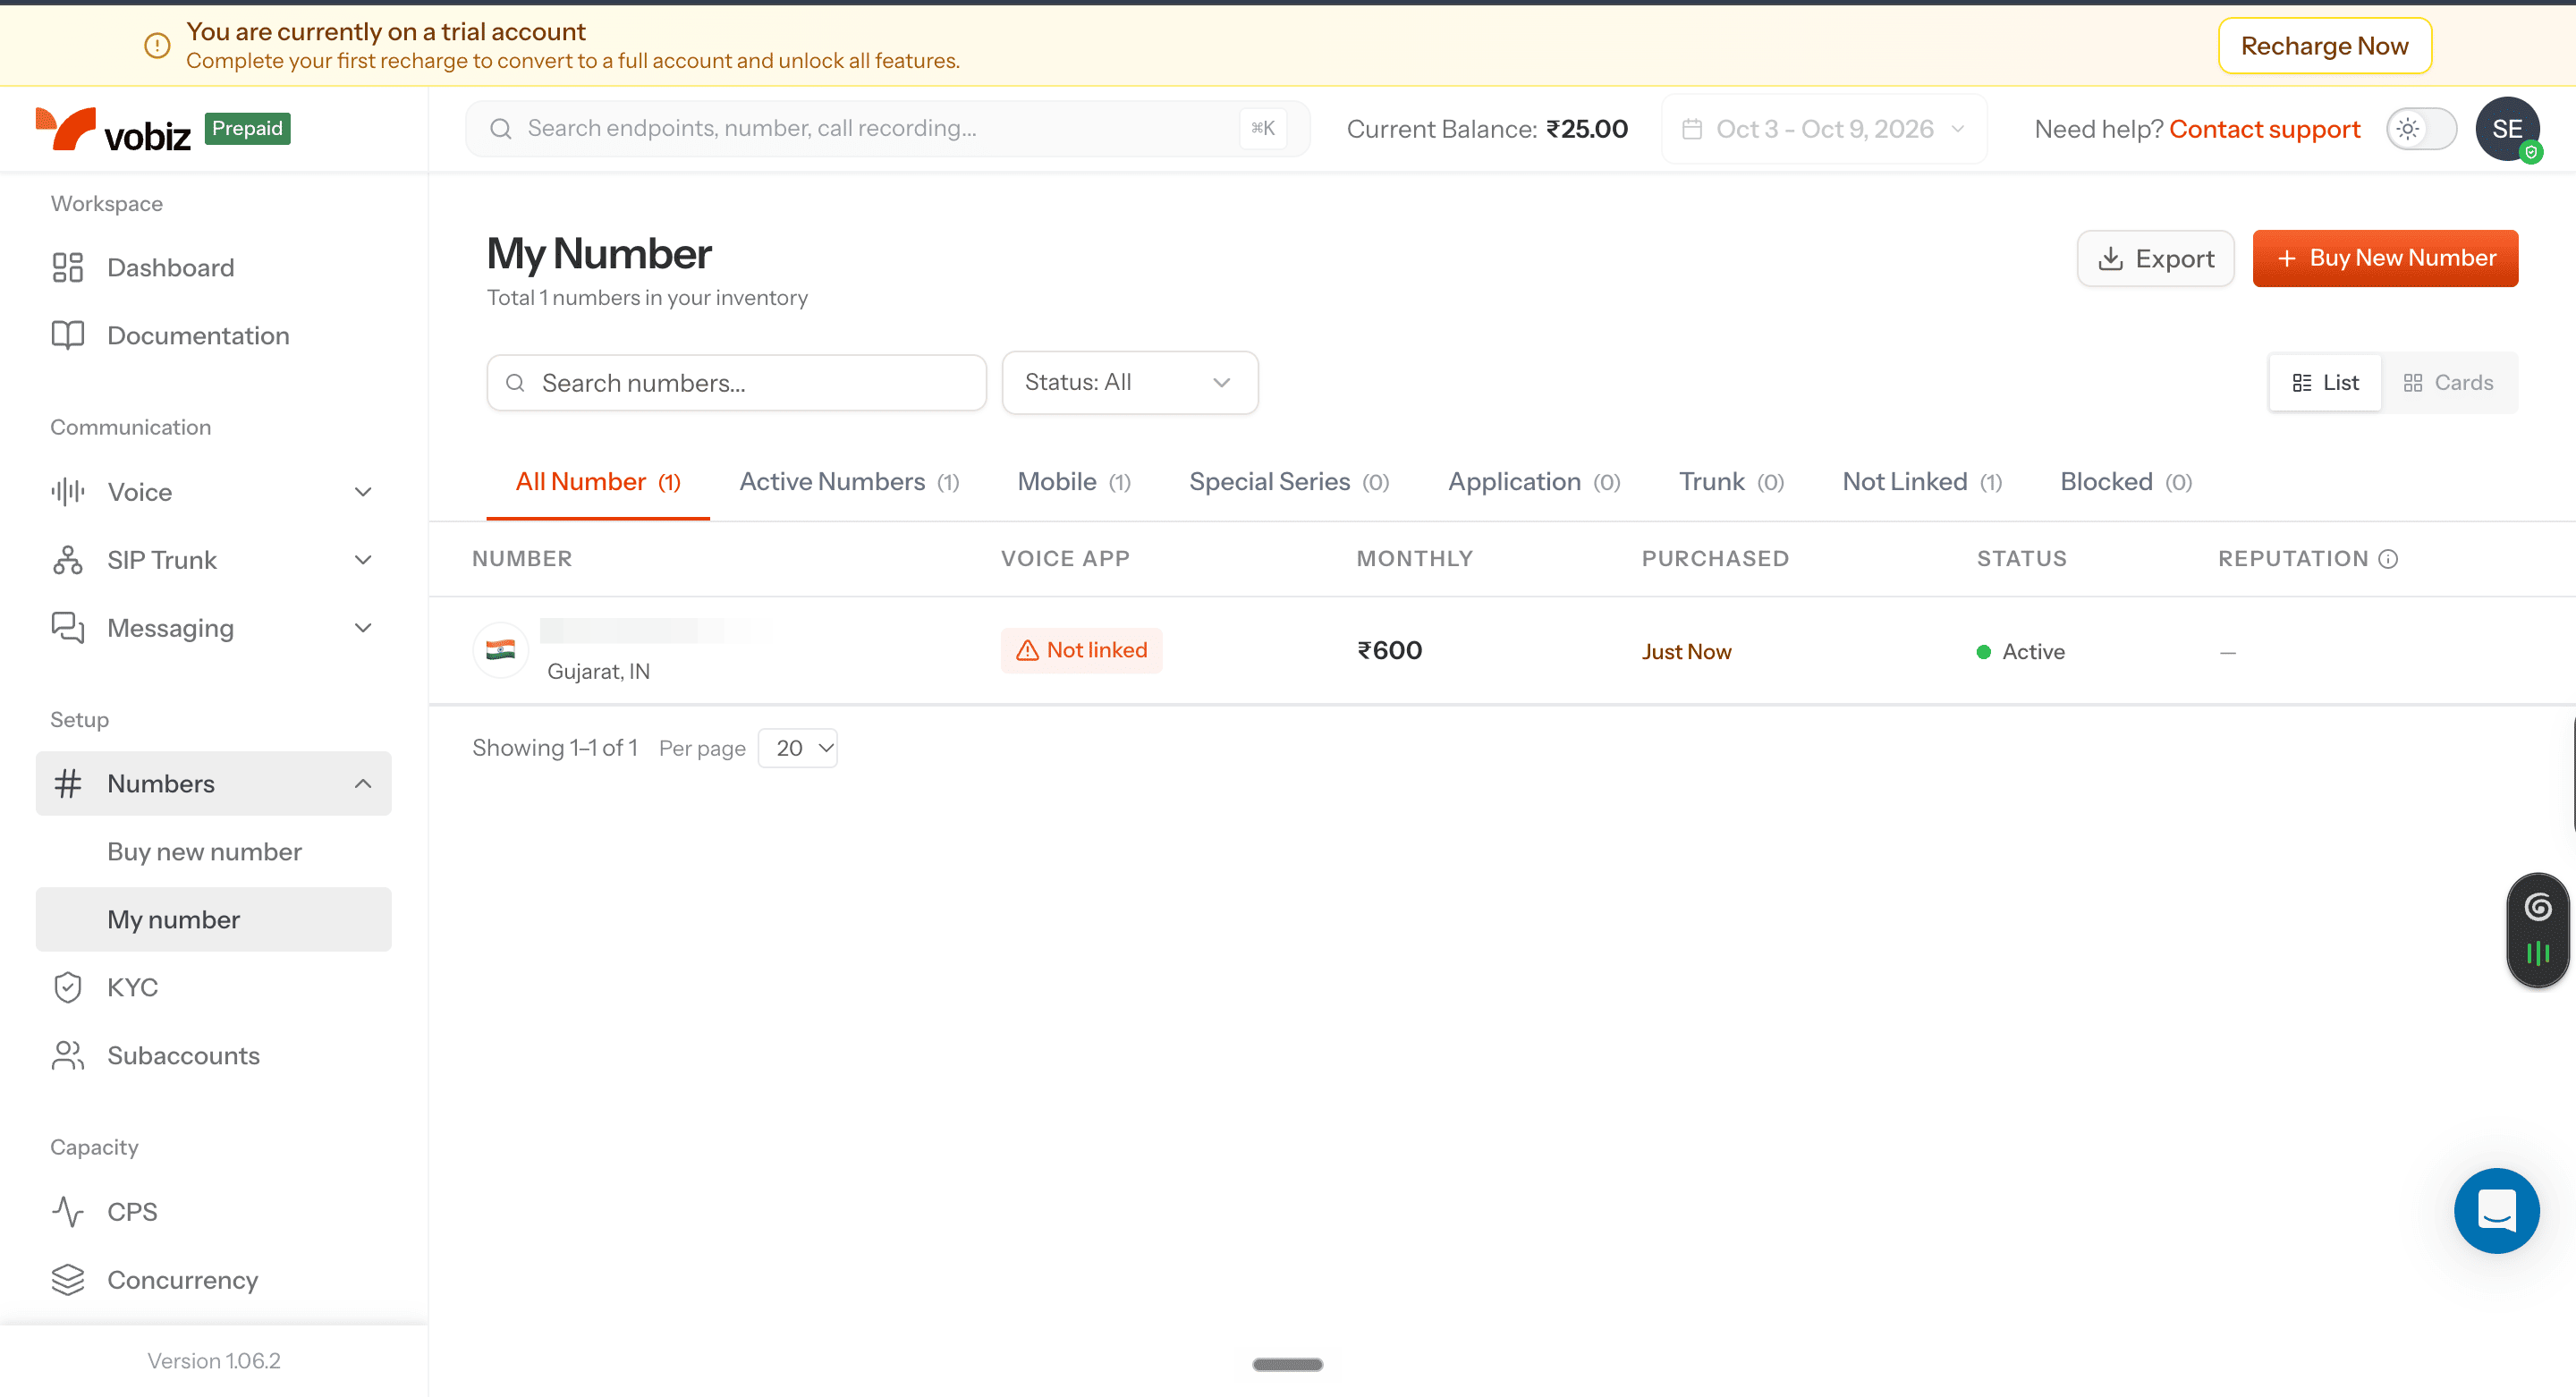
Once purchased, navigate to Numbers → My number. Your purchased number should appear with its status marked Active.
#2. Build the delivery-recovery agent with one prompt.
Last time, we manually wrote our agent’s instructions, created variables, and decided how each conversation should flow.
This time, let’s try something faster.
Sarvam has an AI assistant called Genie that can configure much of a voice agent from a plain-English description. We’ll use it to make our agent today.
But before that, we’ll need to map out how we want our agent to work.
One customer could be unavailable. Another might have entered the wrong flat number. Someone else might no longer want the order. And a customer who wasn’t home might also need to correct their address.
That’s why we need to plan for different conversational paths, not just one ideal conversation.
For each situation, we need to decide what information the agent should collect, what it must confirm, and when it should hand the conversation over to a human.
Here’s what we narrowed it down to.
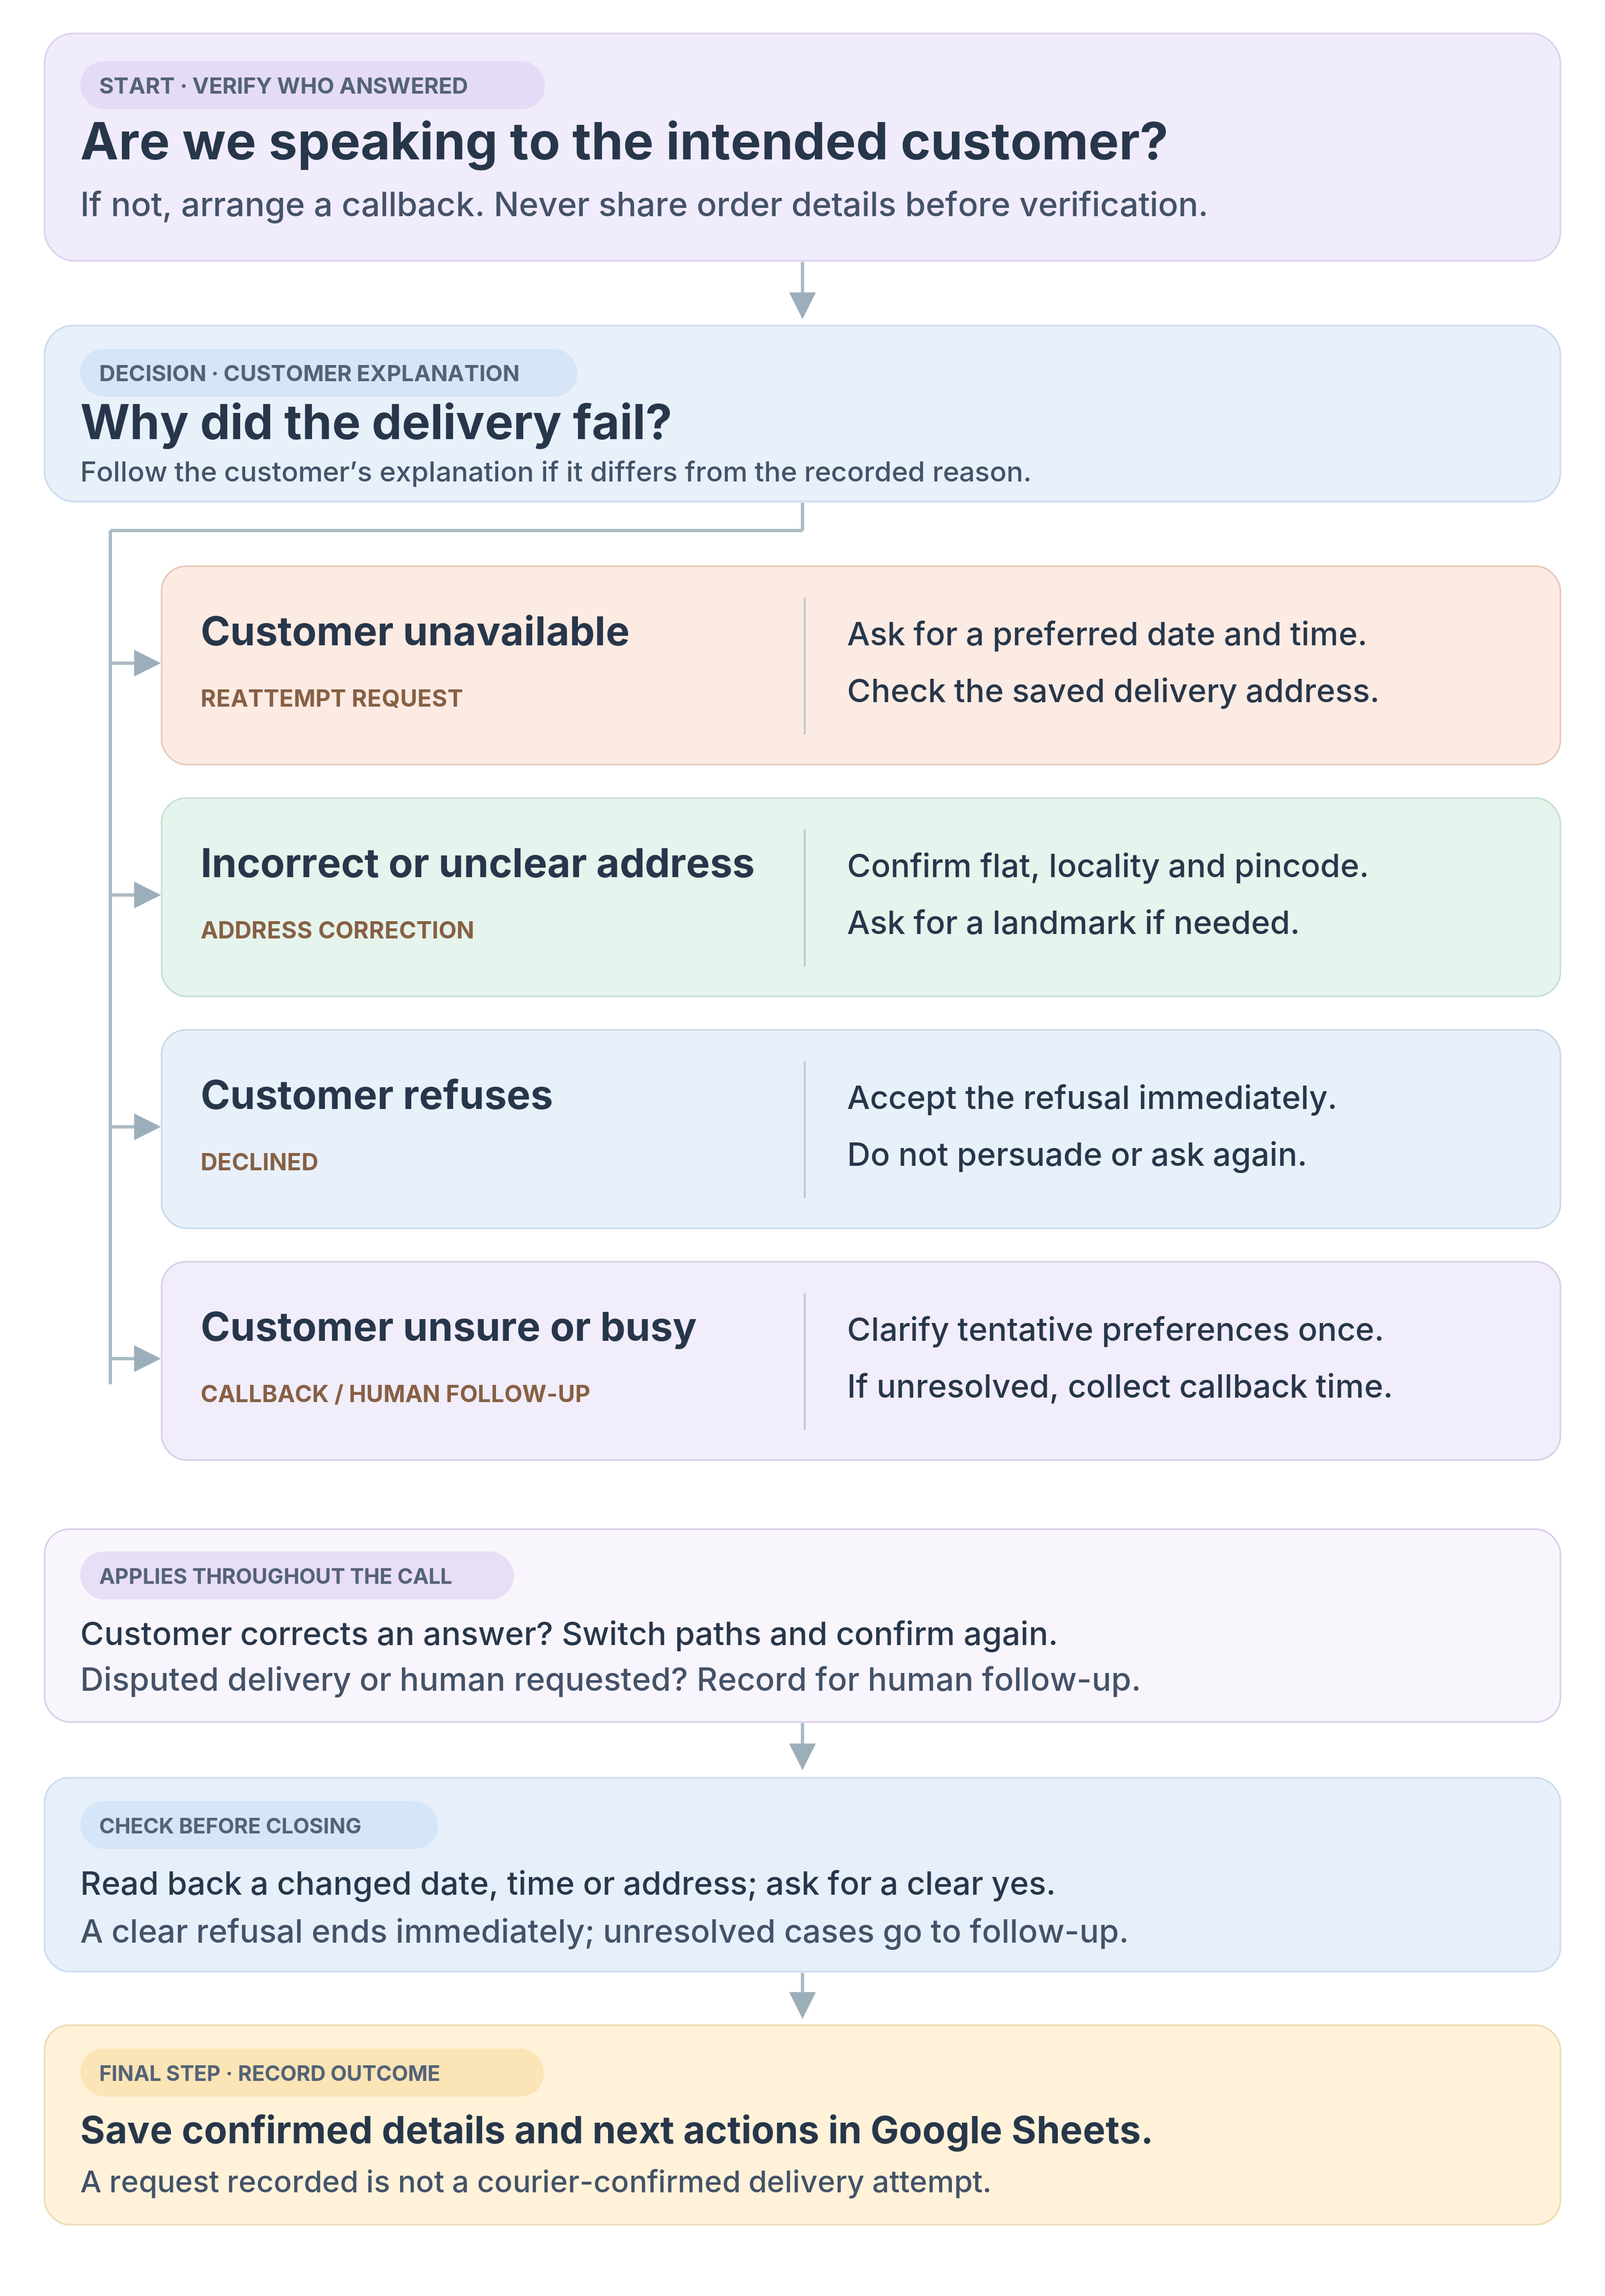
Best practices for prompting.
Sarvam’s prompting guide recommends exactly this approach: define the outcome and the rules, rather than writing a word-for-word script.
Now let’s turn those conversational paths into a prompt.
We’ll give Genie five things:
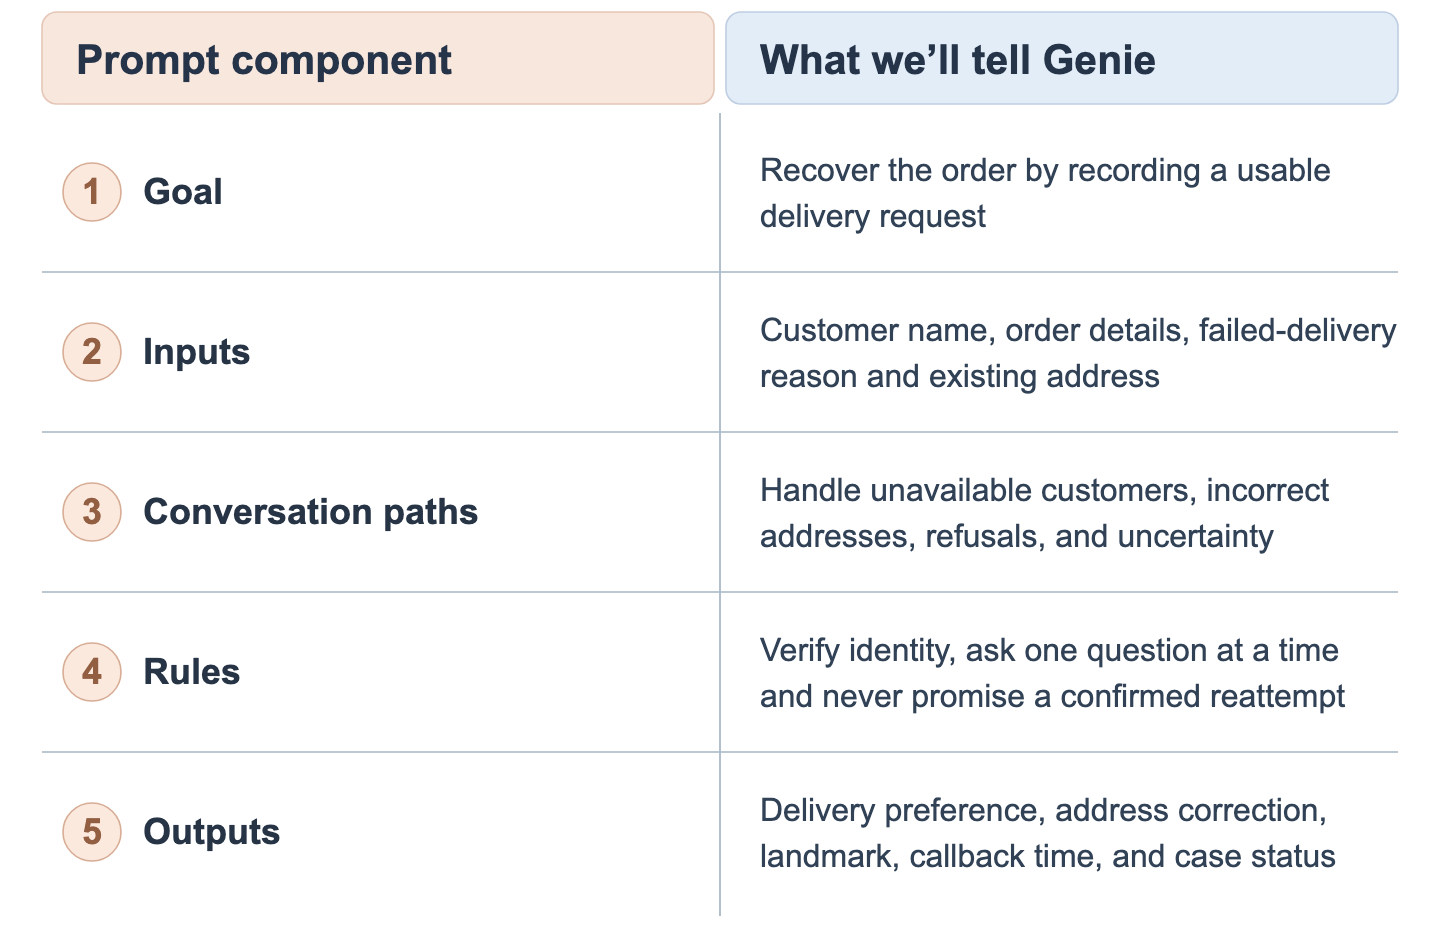
Pay particular attention to the outputs. They determine what our delivery team will know after the call. For example, “Customer wants another attempt” isn’t enough. We need the preferred date, time window and whether the existing address is correct.
And we need to distinguish a confirmed customer preference from a delivery that the courier has actually scheduled.
#3. Set up Sarvam.
Open Sarvam AI → Voice Agents → Build → Agents. Find the field “What should your voice agent do?”
Instead of writing individual instructions, we’ll describe the entire product.
Here’s the prompt I’d give Genie.
**Create a Delivery Recovery Assistant for an Indian e-commerce brand.**

### Goal
Call customers after unsuccessful deliveries and collect the information needed for another attempt. Record a clear outcome for the delivery team. Do not claim that the courier has confirmed a reattempt.

### Customer context
Use these input variables: `brand_name`, `customer_name`, `customer_phone_number`, `order_id`, `attempted_delivery_date`, `ndr_reason`, `original_delivery_address` and `original_pincode`.

### Conversation paths
Verify the intended recipient before sharing order details.

- **Customer unavailable:** Ask for a preferred delivery date and time window. Then check whether the existing address is correct.
- **Incorrect address:** Collect the corrected flat number, locality and pincode. Ask for a landmark or access instructions if needed. Repeat the corrected details for confirmation.
- **Customer refuses:** Accept the refusal, record it and end politely.
- **Customer unsure or busy:** Clarify tentative preferences without repeating questions. If unresolved, collect a callback preference.
- **Customer disputes the delivery attempt:** Record the dispute, ask whether they still want delivery and flag it for human review.

Follow the customer's explanation if it differs from the recorded failure reason. Allow customers to correct earlier answers.

### Conversation rules
Ask one question at a time. Keep responses under 30 words. Support English, Hindi and Hinglish. Confirm final delivery preferences and address corrections explicitly.

Never ask for OTPs, payment information or banking details. Never promise a confirmed delivery slot. Offer human follow-up when required.

### Information to capture
Create these output variables:

- `resolution_status`: REATTEMPT_REQUESTED, ADDRESS_CORRECTION, DECLINED, CALLBACK_REQUESTED or UNRESOLVED
- `preferred_delivery_date`
- `preferred_delivery_time_window`
- `address_confirmed`
- `corrected_address`
- `landmark_or_access_instructions`
- `callback_datetime`
- `delivery_attempt_disputed`
- `requires_human_followup`
- `call_summary`

Use explicit extraction descriptions for each output. Leave information unknown rather than inventing it.

Prepare the output variables for a post-call Google Sheets workflow.

Create the initial agent and show me its build plan before deploying or making any calls.
Now, Genie will prepare a build plan covering the agent’s instructions, variables, guardrails and conversation settings, and ask for any missing details.
Review the plan before saving the agent. In particular, check that every conversation path has a clear outcome and that the output variables capture what the delivery team needs.
#4. Checkpoint 1: Testing the prompt.
Let’s see how it behaves on a call, now. Open Test Agent in Sarvam and give it a sample failed-delivery order.
You’ll have to configure variables within the Setup menu here to simulate a proper Test call.
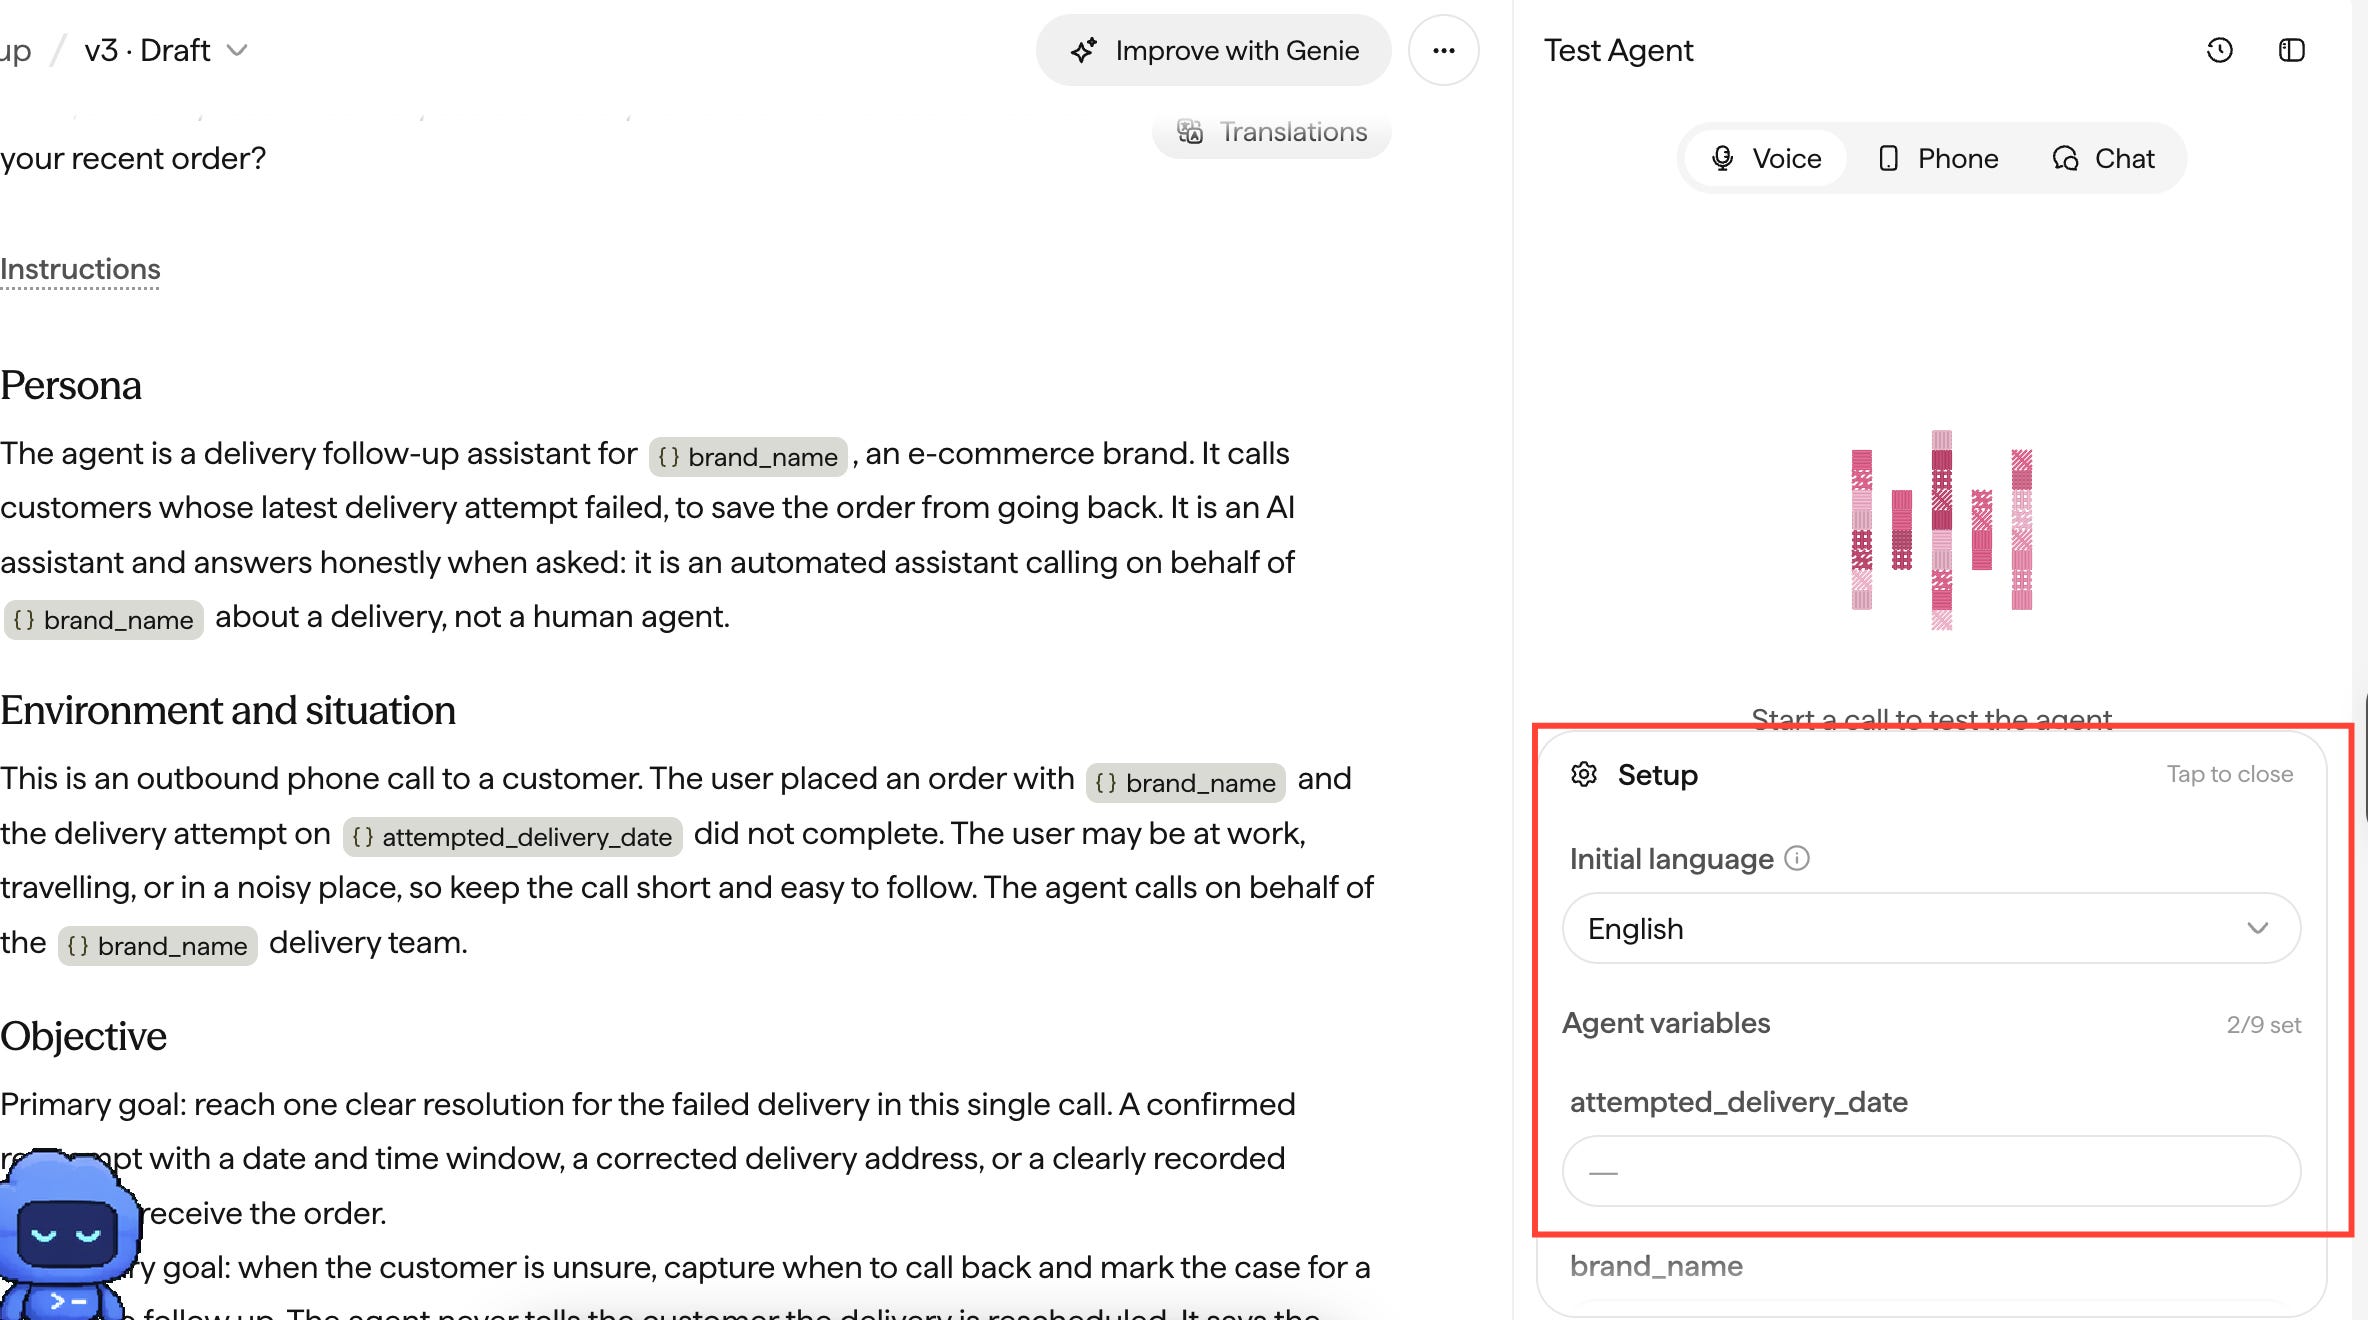
Here’s what ours sounded like.
Our agent could now handle a customer who changed their address. But there was still a problem: the customer had to bring up the address change themselves.
What if they didn’t realise the order was still going to their old address?
What we learned: Start with the main conversational paths, but don’t assume you’ve covered everything. Testing with realistic customer responses reveals missing information and helps you decide what the agent should ask proactively.
In our case, verifying the existing address turned out to be just as important as confirming when the customer would be available.
#5. Iterate.
We decided to make the agent more proactive. Instead of asking only when the customer wants another attempt, it now reads back the address already on the order and asks whether that’s still where the package should go.
If the address hasn’t changed, the conversation moves to delivery availability. If it has, the agent collects the new details before proceeding.
This way, we’re not just responding to the reason recorded for a failed delivery. We’re checking whether the next attempt has the information it needs to succeed.
Want to make the agent more proactive about delivery address change. While asking the user when they want the delivery attempt to be the agent should also confirm the address by reading it out. Any address change hereon should be noted.Verdict: This version of the agent gets the job done.
#6. Send the results to Google Sheets
Our AI can now collect a preferred delivery date, confirm an address change, and record directions that might help the delivery partner find the customer. But none of this helps the seller unless the information reaches the delivery team.
We’ll use Google Sheets as our recovery dashboard.
Here’s what we’ll capture so that the agent can reference it and the sheet gets updated:
What happened? Did the customer request another attempt, change their address, decline delivery or ask for a callback?
What did we collect? The confirmed date, time window, corrected address and landmark.
What needs action? Whether someone needs to review the address, contact the customer or arrange another attempt.
Sarvam lets us extract this information using output variables and send post-call results through a webhook. We’ll connect that webhook to Google Apps Script, which writes the results to our Sheet.
That way, every completed call leaves behind a record the delivery team can act on.
Here’s what to do:
1. Check your output variables in Sarvam.
Under Variables → Output, make sure we’re capturing the customer’s preferred date and time, any address changes, landmarks, whether human follow-up is needed, and a call summary.
2. Create a tab called Recovery Outcomes.
We’ll store one row for every call attempt, including unanswered calls, so we don’t accidentally count them as customers refusing delivery.
The script below will automatically add the column headers.
3. Connect Google Sheets to Sarvam
In your spreadsheet, click Extensions → Apps Script.
Delete the placeholder code and paste this script. It reads Sarvam’s documented campaign-webhook payload and saves the extracted information into the correct columns.
const SHEET_NAME = "Recovery Outcomes";

function doPost(e) {
  const secret = PropertiesService.getScriptProperties()
    .getProperty("WEBHOOK_KEY");

  if (!secret || !e || !e.parameter ||
      e.parameter.key !== secret) {
    return ContentService.createTextOutput("Unauthorized");
  }

  try {
    const data = JSON.parse(e.postData.contents);
    saveRecovery(data);
    return ContentService.createTextOutput("Success");
  } catch (error) {
    console.error(error);
    return ContentService.createTextOutput("Error");
  }
}

function safeCell(value) {
  const text = String(value ?? "");
  return /^[\s]*[=+\-@]/.test(text) ? "'" + text : text;
}

function saveRecovery(data) {
  const sheet = SpreadsheetApp.getActiveSpreadsheet()
    .getSheetByName(SHEET_NAME);

  if (!sheet) throw new Error("Recovery Outcomes tab not found");

  const id = String(data.attempt_id || data.interaction_id || "");
  if (!id) throw new Error("Missing call ID");

  const lock = LockService.getScriptLock();
  lock.waitLock(10000);

  try {
    const last = sheet.getLastRow();

    if (last > 1) {
      const existing = sheet.getRange(2, 1, last - 1, 1)
        .getDisplayValues().flat();

      if (existing.includes(id)) return;
    }

    const input = data.initial_agent_variables || {};
    const output = data.output_agent_variables ||
      data.final_agent_variables || {};

    const row = [
      id,
      input.order_id || output.order_id || "",
      data.completion_status || "",
      data.connectivity_status || "",
      output.resolution_status || "",
      output.preferred_delivery_date || "",
      output.preferred_delivery_time_window || "",
      output.address_confirmed ?? "",
      output.corrected_address || "",
      output.landmark_or_access_instructions || "",
      output.callback_datetime || "",
      output.requires_human_followup ?? "",
      output.call_summary || ""
    ];

    sheet.appendRow(row.map(safeCell));

  } finally {
    lock.releaseLock();
  }
}

// Create the webhook key automatically.
function setupSecret() {
  const properties = PropertiesService.getScriptProperties();

  if (!properties.getProperty("WEBHOOK_KEY")) {
    properties.setProperty(
      "WEBHOOK_KEY",
      Utilities.getUuid() + Utilities.getUuid()
    );
  }

  Logger.log("Webhook key created");
}

// Test the Sheet without making a phone call.
function testSave() {
  saveRecovery({
    attempt_id: "DEMO-RTO-001",
    completion_status: "completed",
    connectivity_status: "connected",
    initial_agent_variables: {
      order_id: "56789"
    },
    output_agent_variables: {
      resolution_status: "ADDRESS_CORRECTION",
      preferred_delivery_date: "2026-11-01",
      preferred_delivery_time_window: "After 5 PM",
      address_confirmed: "yes",
      corrected_address: "Jayanagar, Bengaluru",
      landmark_or_access_instructions: "Brown gate",
      callback_datetime: "",
      requires_human_followup: "yes",
      call_summary: "New address and delivery preference recorded. Courier confirmation pending."
    }
  });
}
4. Test Google Sheets first
Save your script.
In Apps Script’s function dropdown, select
testSave.Click Run and approve the permissions.
Return to
Recovery Outcomes.
You should see a test row for order 56789, with a corrected address, preferred date and call summary.
That confirms the script can write to Google Sheets. It doesn’t yet test Sarvam.
Step 5. Automatically generate your secret
This is the part that was confusing earlier. You do not need to make up a password or replace a placeholder.
In the Apps Script function dropdown, select
setupSecret.Click Run.
Open Project Settings (gear icon on the left).
Scroll down to Script Properties.
Find
WEBHOOK_KEY. Its value has been generated automatically.Copy that value privately.
6. Give the script a web address
Just like the earlier article:
Click Deploy → New deployment → Web app.
Set Execute as: Me.
Set Who has access: Anyone.
Deploy and copy the web app URL.
Add ?key= and the WEBHOOK_KEY value you copied.
For example, the final URL will have this structure:
https://script.google.com/macros/s/YOUR_DEPLOYMENT_ID/exec?key=YOUR_PRIVATE_KEYThose uppercase words represent your actual deployment ID and automatically generated key. Do not type the uppercase placeholders literally.
Keep the complete URL private. Use fictional orders for the tutorial; this shared-key approach is not sufficient security for production customer information.
7. Connect Sarvam to Google Sheets.
Now that our Google Sheets webhook is ready, we need to connect it to Sarvam and make a phone call.
Instead of manually creating a campaign, we asked Genie to do it.
Set up an outbound test campaign for my saved Delivery Recovery Assistant.
Use my connected Vobiz phone number and a CSV containing one fictional failed-delivery order with my own test phone number.
Map the CSV columns to the agent's input variables. Disable automatic retries and use a low dialing rate.
I also want the post-call results sent to Google Sheets. Configure the campaign webhook using my Google Apps Script web app URL, which I will provide.
Show me the campaign settings and webhook configuration for review before launching. Do not start calling until I confirm.
Genie found our number, configured the calling settings, disabled retries and prepared the campaign.
It even noticed that our latest address-confirmation improvement hadn’t been saved as a committed version. It asked whether we wanted to include that change before launching.
After reviewing the configuration, we approved the campaign.
#7. Checkpoint 2: Did our AI send the results to Google Sheets?
After we submitted the prompt, Genie found our connected Vobiz number and asked for two things: the phone number to call and our Google Apps Script webhook URL.
It then configured the outbound campaign, mapped the order details, disabled automatic retries and showed us the settings for approval.
One useful detail: Genie noticed that our latest address-verification changes hadn’t been committed. It asked whether to include them before launching the campaign.
We approved the configuration, and Genie reported that our test campaign was live.
Now for the final check.
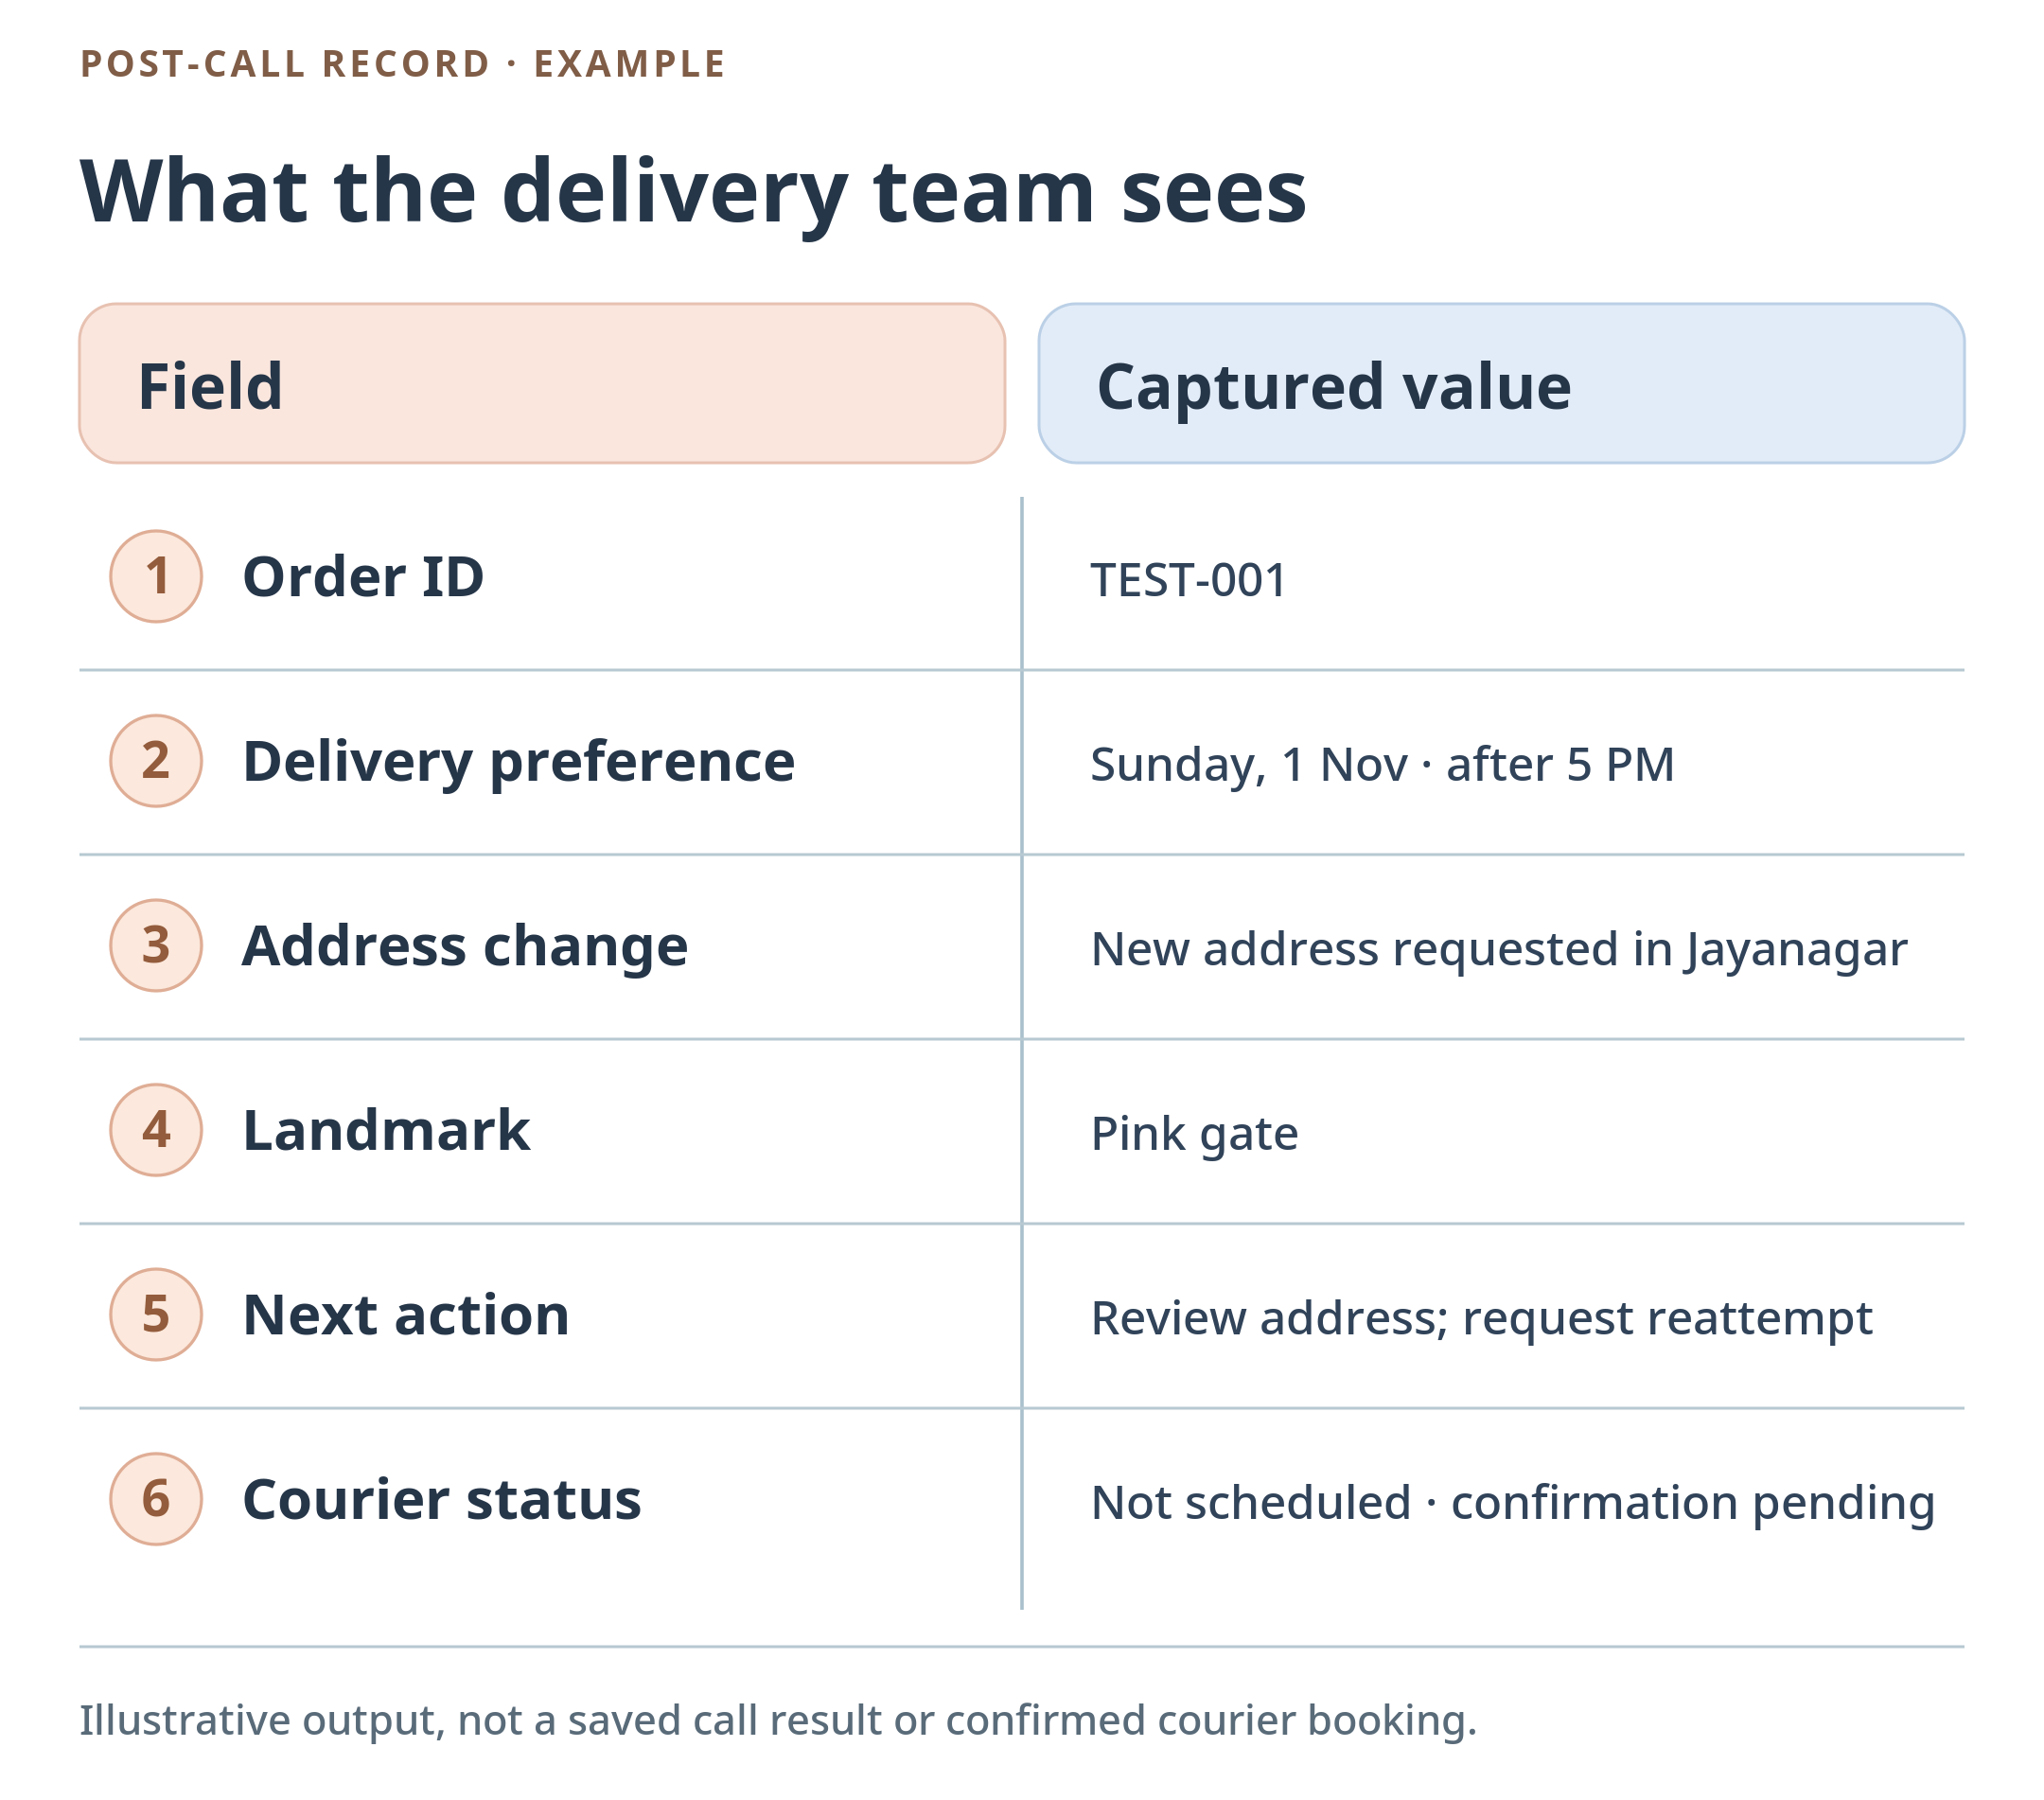
Open the Recovery Outcomes tab in Google Sheets. After the call finishes, we should see a new row containing the order ID, call status, delivery preferences, corrected address and any follow-up required.
If that information appears correctly, we’ve connected the complete workflow: a failed-delivery record, an AI phone call and a structured recovery request for the delivery team.
Ours looked like this.

You can build a product that makes you money.
People like you who joined our new builder cohort did it in 2 weeks along with their day job. With 0 code.
Here’s a sneak peek of what they built.
Nagappan built Wellness Monk, a WhatsApp wellness coach
Om built Samjhauta to finally bring your WhatsApp group on the same page.
You can too; in the next room, we bring together.